Write-Up
For my summative write-up for the year 2020, I'll be going over
the material in
The Flask Mega-Tutorial (Chapters 1-12). To follow along and understand what's happening,
some previous
OOP (Object-Oriented Programming) knowledge is needed, as well as, what I'd classify as an
intermediate/expert
understanding of the Python and HTML5 programming languages. Although, the 'expert' level things can
be picked up on in the later chapters,
considering the fact that I personally came into learning this material as about an intermediate at
both languages.
For things unique to building a dynamic website, you're
hopefully going to find everything you need right here in this write-up.
Side note: pictures aren't always fully shown on small windows or mobile screens, but everything else
all works cross-platform.
Below are clickable links for you to jump straight to
whichever chapter you're on in reading this write-up:
Installing Python
Firstly, you need to ensure that Python is installed onto your machine.
This can be done by visiting the python.org website.
Make sure to have it be at least Python3.6 or later, since older versions
aren't supported by Flask. Also, make sure that you select "add to PATH" upon
installation. By installing Python, you also get pip, which will allow you to
install packages/libraries directly from whatever terminal window you're using.
You can also use your terminal window to check if python is installed by typing
in "python3", or "python" if that doesn't work. This'll display your current version
and enter you into the Python Interpreter, which will be used later for various
python commands, so remember how to access it.

Installing Flask
Once Python is installed, along with pip, you can then use the command below to install packages
(like Flask).

If you're having issues with running this command later on, check to see if you are on
the administrator's account, since it won't work on any other user's account.
In order to take care of issues such as having to maintain different versions of packages
for different applications, Python uses the concept of virtual environments.
It's essentially a copy of the python interpreter. If you install a package into this virtual
environment, it'll remain local and not affect the rest of
your system. Also, another huge benefit to having a virtual environment setup in your
folder ("microblog"), is the portability of your project to other users/computers. Lets say,
if you wanted to put all this code inside of a GitHub repository, like I did when first
making this website with Hassan, you'll be able to clone the repository, along with the venv.
This means that you won't have to go through the process of installing every single package and
such on every single device, but instead, they're ready to go inside of the venv folder.
Yet another benefit to virtual environments, is that they are actually owned by the user that created
them. Which means, that if you faced the issue earlier of not being the administrator on
your computer, you can run commands in here freely.
The first step to this is making a directory to have this virtual environment in.

Then, you need to enter into the directory you've just made.

Now, you can make a new virtual environment, that'll be named "venv". The first word "venv"
is for the Python virtual environment package, while the second "venv" is for your
virtual environment's name, which you can change if you'd like.

Note that in some operating systems you may need to use "python" instead of "python3" in
the command above, since some installations use "python" for Python2.x releases and "python3" for
the 3.x
releases, while others simply use "python" for the 3.x releases.
Once you have your virtual environment created, you need to tell your system that you wish to use it.
To activate your virtual environment you need to type this command on a UNIX (Mac or Linux) system:

If you are using the Microsoft Windows command prompt window (like I am), the activation command is
slightly different:

Once in your virtual environment, you can then use the "pip install (package-name)" command from
earlier to install flask.

"Hello, World" Flask Application
The tutorial I followed for this website made various Python and HTML5 files/folders by using
the terminal and making directories instead of just doing it the easy way. I found that a much
simpler method of doing this was by just doing it all in your IDE (Integrated Development
Environment), like Visual Studio Code. I'm assuming that anyone reading this uses this IDE,
considering it's the one we use at robotics and is among the world's most popular IDEs. If
you do choose to not use Visual Studio Code, just know that most of what I'm saying will apply
to any other IDE, or at least shouldn't be too difficult to figure out yourself. If you want to
follow along either: install an IDE such as VSC (Visual Studio Code Installation) or figure out
how to make folders and files within the terminal.
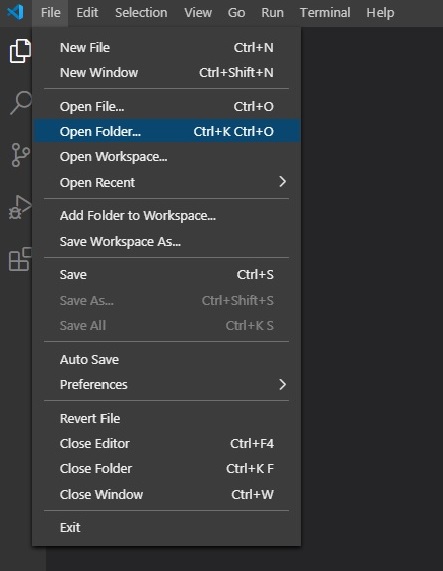
So, let's get into setting up our first folder and Python file inside of it. Firstly,
you want to open a new window of Visual Studio Code, click "File" -> "Open Folder"
Then, navigate through to your folder called "microblog". If you aren't sure where this folder is,
you can do a search or look at the file path from when you were doing commands in the terminal, as
shown below.

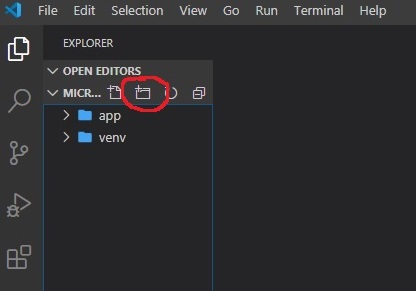
Next, you just want to click "Select Folder". Once you have the folder open, you'll notice how the
"venv" folder has already been made inside of your "microblog" folder. It contains all the things
you've installed into your virtual environment thus far. Now, you want to make a new folder at the
same 'level' as this folder. You do this by clicking on the button shown below to make a new folder
directly inside the "microblog" one - make sure you haven't selected the "venv" folder and are
just in the "microblog" folder. You're going to name this new folder "app".
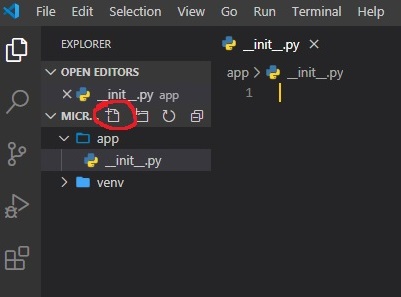
Inside of the new app folder, you're going to make a new file by clicking on this button, and name it
"__init__.py". This'll let Visual Studio Code know about which kind of file it is by its file
extension.
This is ".py" in our case, which is short for Python. "__init__" signifies it as being the
initialization file.
Now, we finally get to the fun part of making the website - coding it! Feel free to copy the code
exactly to
follow along. Although, I would highly suggest typing it out yourself to get a feel for actually
doing so,
rather than copy-pasting it.
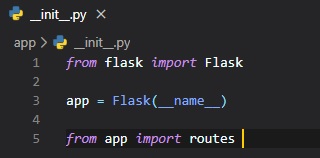
The Python script above instantiates the application object from the Flask class. The __name__
variable used as
a parameter to the Flask class is a predefined variable in Python, which is set to the name of the
module in which
it's used. Later on, Flask will use the location of this module passed here as a starting point when
it
needs to load associated resources such as template files (HTML5 front-end files). We then import
"routes" from the
folder we made earlier called "app". In case you were curious, the reason as to why we're importing
routes at the bottom,
instead of at the top like usual, is because routes references the app variable created here in this
file. You don't need
to worry about this too much for now, but just know that this is a little work-around for a common
issue with Flask applications,
being that they mutually reference each other sometimes and can cause an error by doing so. However,
as of now, the routes file
has not yet been created. So, let's do that!
Just like how you did it earlier, you're going to be making yet another python file inside of the
"app" folder, name
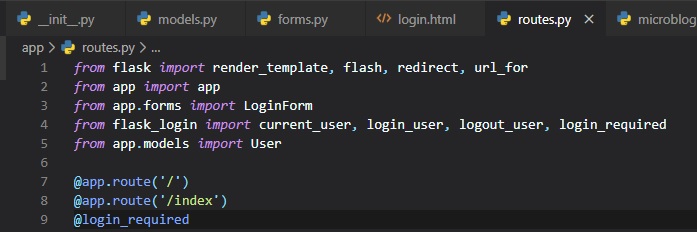
it "routes.py". Once you've done this, type this code into that file.
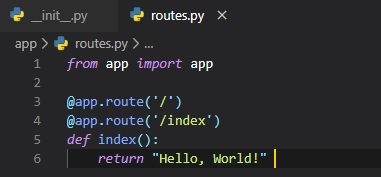
This file will be used to make various 'routes' to the URLs for the application, or its different
'pages'/'views'.
The routes are the different URLs that the application implements. With the Flask web framework,
handlers for the
application routes are written as Python functions, called view functions. These functions are
mapped (like a pointer)
to one or more route URLs so that Flask knows what to execute under that URL.
This view function is very simple, all it does when a user accesses this URL (either '/' or '/index')
is return "Hello, World!"
The two @app.route lines above the function are what's known as decorators. They're not part of the
flask framework, rather
they're built into Python, meaning you might see them elsewhere in other projects of yours later on.
They essentially act
like modifiers for the function under them. This decorator take the URL as an argument inside of the
brackets and associates
it with the function. This means that when a user accesses either of the two URLs, the function
below them will be executed.
Most of the time, though, these functions only require one of these decorators in order to get
called. It's just that whether
the user is on the default (blank or '/') URL, or on the '/index' URL, we want it to run that same
function.
To finally get the application up and running on your browser, there is one more Python script you
need to make. It should be
made a top 'level' of all your files inside of microblog. Meaning, it is on the same 'level' as
"app" or "venv". You do this
by clicking on the new file button after having clicked on the microblog folder so that you make a
file directly inside of
this folder.
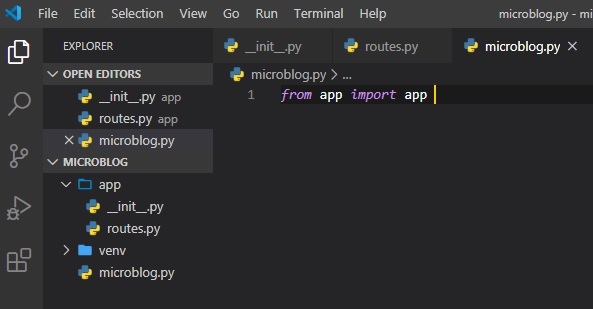
This one line of code just imports the application instance from the app package. I know it can be a
little confusing with having them
as the same name, but to re-clarify: the first "app" is the variable in which we instantiated the
app class object inside of, and the
second "app" is the package class it's getting instantiated from in the app.py file. Feel free to
change the variable name or importing
the app package as a different name by doing the following: "import app as (new name for it)" as
opposed to simply doing "import app"
at the top of the "__init__.py" file.
The last step before running your application on a localhost is setting up the FLASK_APP environment
variable. On a windows machine,
you need to do this following command:

On other machines, you need to type "export" instead of "set" like so:

Get used to running this command in your virtual environment. You're going to have to do it every
single time you re-launch your
terminal to run this application. Also, if you're running multiple flask applications, you're going
to have to make sure you're
in the right flask_app environment. This has caused a lot of frustration in the past for me, when I
didn't realize I had actually
just been in the wrong flask_app environment. Save yourself the headache and always remember to do
this when opening up the terminal
for running your flask application.
Finally, the last thing left to do is run your flask application.
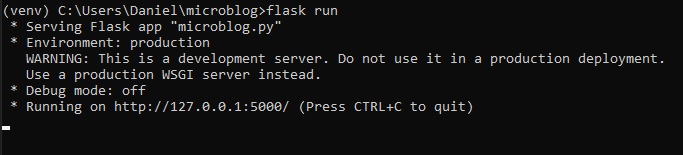
To access the application that's just been run on your computer, you can type "localhost:5000" into
your browser's address bar.
If you remember from earlier, though, we set up 2 different URL decorators to access this same page.
This was the first one ('/'),
alternatively, you can also type "localhost:5000/index". However, these are the only two URLs you
can type in at the moment.
In the terminal, once you're done, you can press Ctrl-C to stop the application from running.
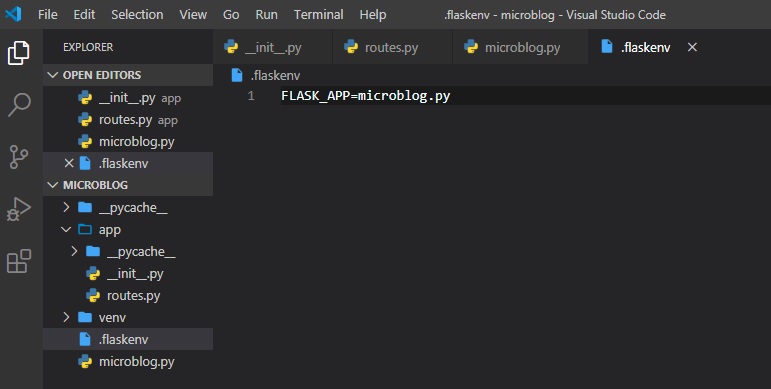
Before we leave off this chapter, there's one more thing to mention. If you'll find it tedious to
reset the flask_app environment
variable every single time you open up the terminal window, you can setup a file at the top 'level'
of your "microblog" folder
that'll be called ".flaskenv".
Then, after doing this you need to type in this command into the terminal:

Now, to run your flask application again in the future, all you need to do is go into the terminal
and follow these steps:
- "cd (directory)" into the right directory, which should be "microblog" at the end of the file
path you're in
- activate your virtual environment
- if you didn't make the .flaskenv file and haven't automatically set your flask environment
variable, do so
by typing in the proper command: "set"/"export" FLASK_APP=microblog.py
- type "flask run" into your terminal
- visit the "localhost:5000" address in your browser
- press Ctrl-C to stop deployment
Introduction To Templates
Since, we don't yet have users on our webpage, we don't have to worry about that yet, instead, we can
make mock ones.
We're going to be implementing these as Python dictionaries, linking a user's username to their
username. In our case,
we'll name our first mock user "Bogar". Having mock objects or components to your website is a
really useful thing in
web development. It allows you to concentrate on one part of the application without having to worry
about the other
parts of the system that don't exist yet, while still being able to test it out like it were
implemented already.
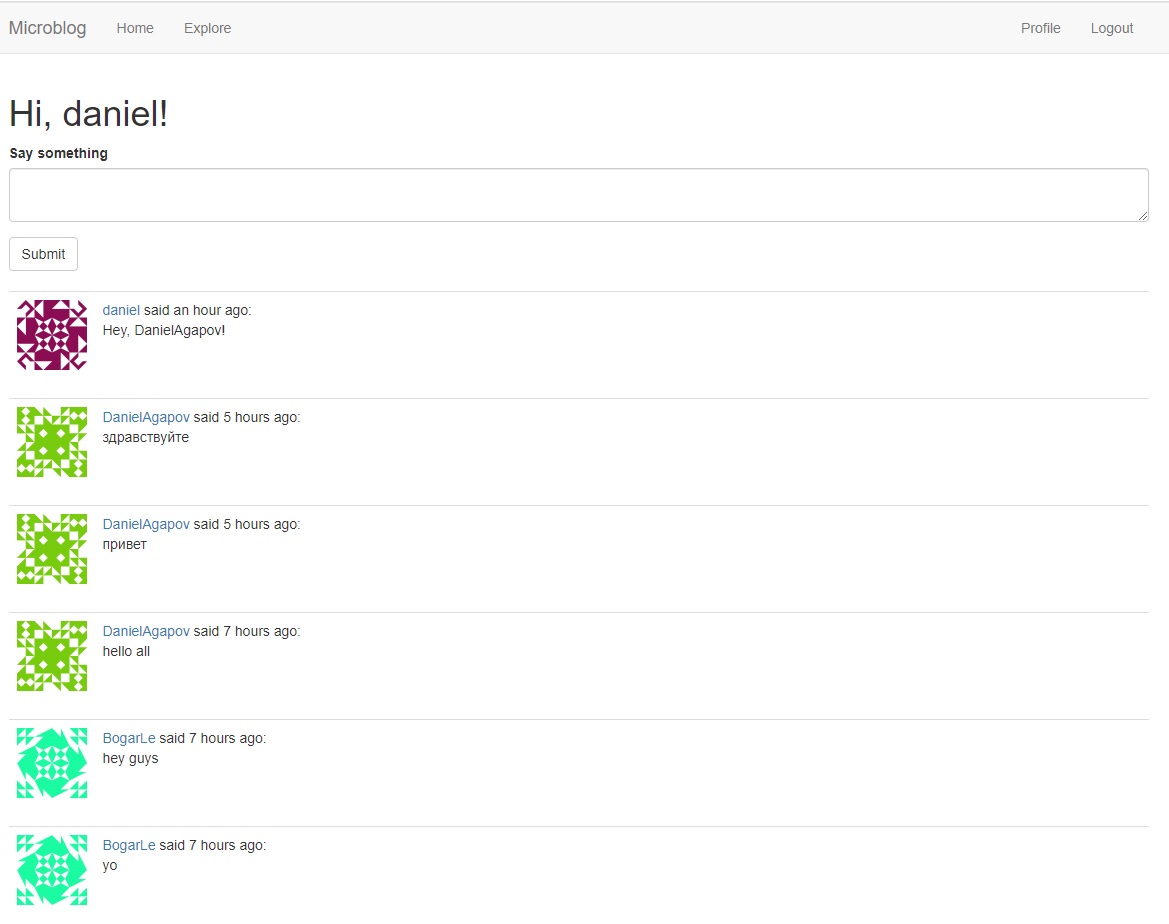
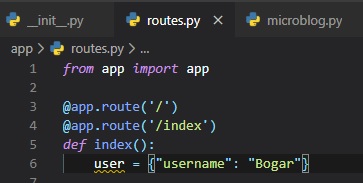
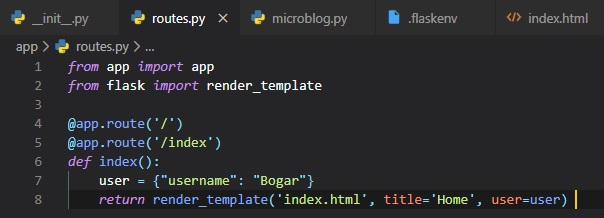
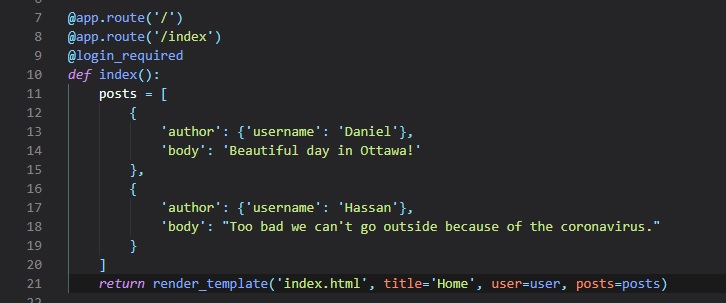
Right now, we want to create our homepage that'll display a custom message based on our user's
username being "Bogar".
The first step to that is to set a mock username to the variable "user".
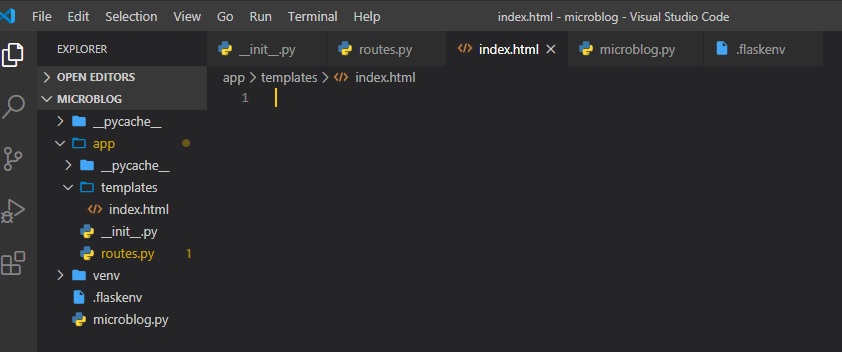
Now, though, we need to return something from this view function and display it on the website. We'll
do this by having
an HTML5 file. To make this file, we first need to make a new folder called "templates" inside the
"app" folder. Then,
inside of the new "templates" folder, make a new file called "index.html". This is the standard name
among various HTML
applications to indicate the main page of a website.
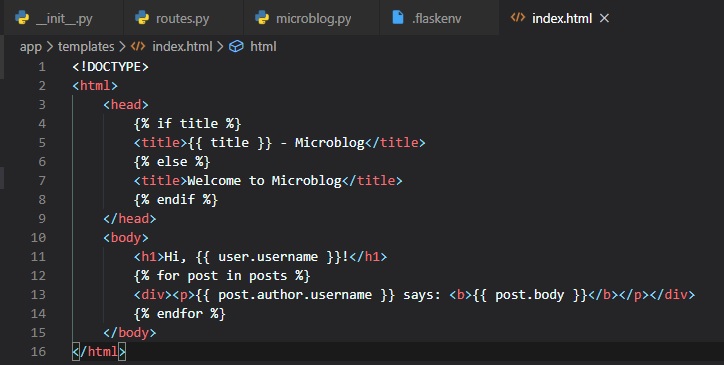
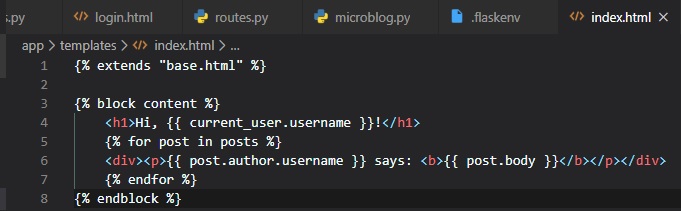
Now, we need to give it a title to have displayed in the tab bar and our message inside of the body.
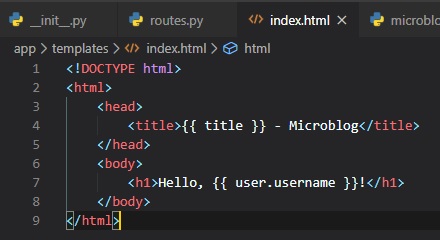
This is a pretty basic HTML page, other than the {{...}} symbols. These represent placeholders for
dynamic content, like variables.
Now, we need to head back to the routes.py file and return something in the index view function. For
this, we'll be importing
a function from flask called "render_template". This function takes a template
filename ('index.html') and a variable list of
template arguments in our placeholders and returns the template, now with actual values instead of
placeholders for those values.
You can now, of course, try this in your browser once again, to see how the content got modified.
User Posts
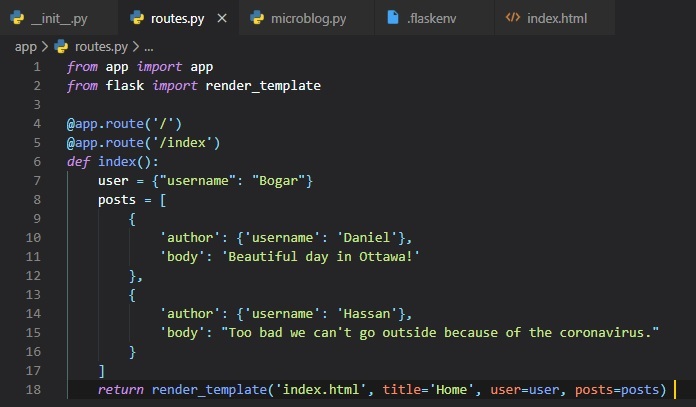
Once again, we're going to make use of mock users and also some new mock posts to display users and
their posts on the home page.
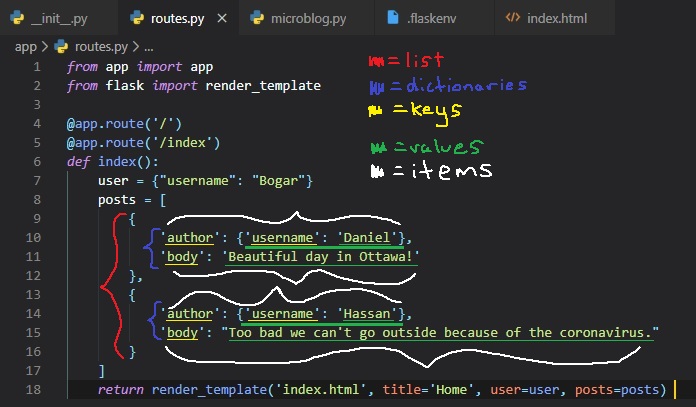
I know that this can seem pretty complex, but I'll try explaining these different data types and
colour-coding parts of it in the image.
To represent user posts we'll be using a list. Inside this list, there'll be two dictionaries with
"author" and "body" fields.
The first post dictionary's first item's "author" field has a dictionary as its value, and in this
dictionary, lies the key ('username') along
with the value ('Daniel').
Now, we have to update the index template. Since, the list of posts can have any number of elements,
it's up to the view function to decide how many posts are going to be presented in the page. The
template cannot
make any assumptions about how many posts there are, so it needs to be prepared to render as many
posts as the view sends.
We can do this by making a simple for loop that iterates through the posts and, for each post, has
the post author's username
and its post body to put in a paragraph tag. The little conditional I put in the head tag is pretty
simple to understand. It
just evaluates whether there's already a title for this page, and either uses it in the title before
"- Microblog" or generates
the generic title of "Welcome to Microblog".
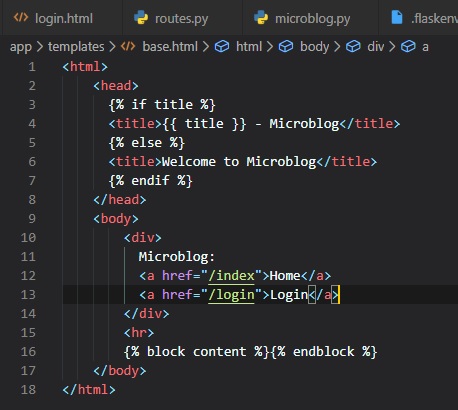
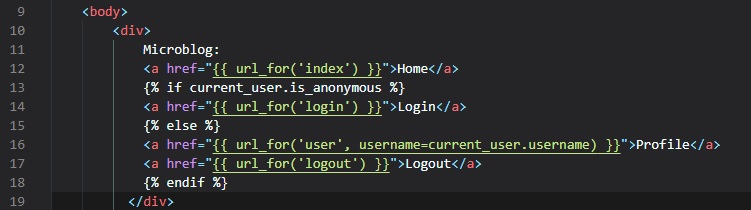
Template Inheritance
Just like this website you're currently on, many have navigation bars at the top of their pages, with
a few links. The links
on this website are: "HOME", "WRITE-UP", and "ABOUT RAVENSCOUT". This isn't very hard to do normally
by just copy-pasting the
same links into every single file, but there's a simpler way to do this in HTML5. For good practice,
we want to avoid repetition
at all costs in programming if it's more efficient.
Jinga2, which is included in Flask, has a template inheritance feature that helps us with avoiding
repetition in our HTML files.
It essentially allowed you to make one 'base' file, which we'll call "base.html" that'll have all
parts of the page layout that
are common to all templates, from which other templates are derived from.
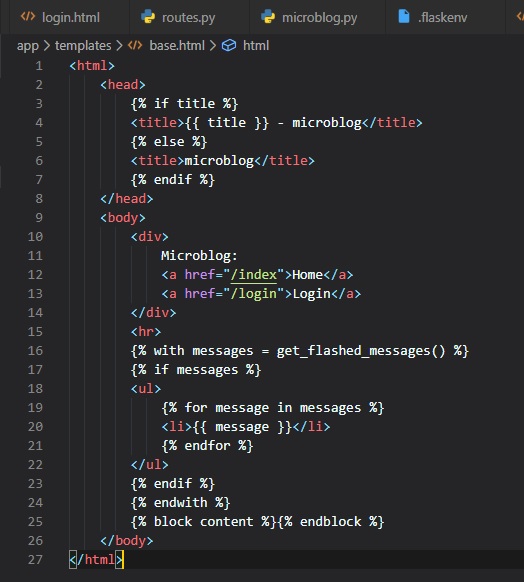
Let's go ahead and make this file in the templates folder and call it "base.html". It'll include a
simple navigation bar and the
title conditional logic implemented earlier into the index.html file.
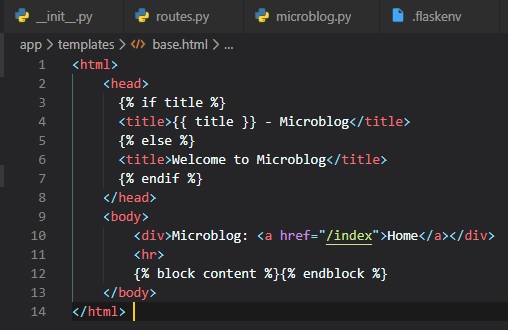
In this main template, the block control statement (anything inside of {...}) is there to define the
place where the derived
templates can insert themselves into this one. Blocks are given a unique name, which derived
templates can reference when they
provide their proper content. Now, we can adapt the index.html file to now inherit from this base
template we've just made.
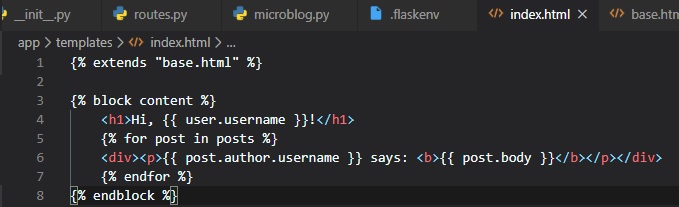
The base.html template file will now be taking care of all the general page structure parts, so all
that's required in the
index.html file is its proper content for that page. The "extends" control statement establishes the
inheritance link between the
two template files. In more complicated terms, this means that Jinja2 know that when it is asked to
render index.html it needs to
embed it inside base.html. Two two templates have matching block statements named "content", and
this is how Jinja2 knows how to
combine the two templates into one. Now, for any additional pages, this base.html template has you
covered and will just need to be
extended once again, in the same manner. This is how we can achieve the same look and feel of two
web sub-pages without the need for duplication.
Introduction To Flask-WTF
We are now going to be addressing our little issue of only having mock users. This will be done
through the use
of web forms by accepting input to store actual users. Web forms are key in most web applications,
being one
of the most basic building blocks to making a great web application. We'll be using forms to allow
users to submit
posts, and also for logging in to the application.
This is where the Flask-WTF extension will come in handy. There will also be many more flask
extensions to come
in the future. Once again, you can install this into your virtual environment by using the command
seen below, like you've done previously.

Configuration
The application we've made so far is very simple, and for that reason we don't need to worry about
its
configuration. However, in many cases with web apps, you might find yourself wanting to configure
some variables
that'll get passed to the Flask web framework to personalize your website.
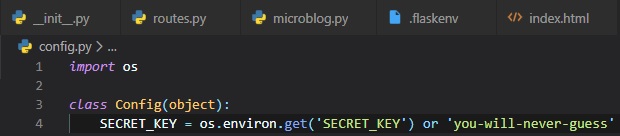
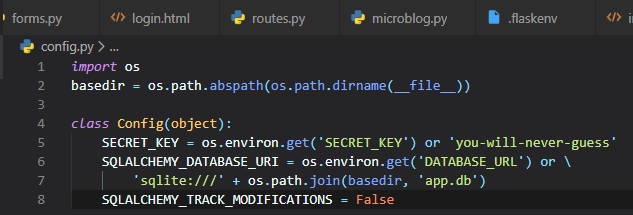
There's several formats for the application to specify configuration options. The format we're going
to be using
is to store configuration variables in a class. This file named "config.py" will be made directly
inside the main
"microblog" folder, on the same level as "microblog.py"
If we eventually get to need more than one configuration set, then there is an option to make
subclasses of this
configuration class.
The SECRET_KEY configuration variable is used as a value for a cryptographic key. Flask uses this to
prevent
a Cross-Site Request Forgery attack or CSRF. The value of this secret key is set as an expression
with two
terms, joined by the or operator. The first term looks for the value of an environment variable,
also called
SECRET_KEY. The second term, is just a hardcoded string. This is a pttern that you'll see repeated
often for
config vaiables.
The idea's that a value sourced from an environment variable is preferred, but if the environment
doesn't
define the variable, then the hardcoded string is used instead. When you're developing this web
application,
the security requirements are low, so you can just ignore this and let the hardcoded string be used.
However,
when it's deployed onto a production server, you should set a unique and difficult to guess value as
the
environment variable.
Now that the config file's setup, we need to let Flask know about it. So, we need to go back to the
Flask application
instance in the __init__.py file. To do this, we need to call the method known as "from_object" and
have "Config"
as a parameter.
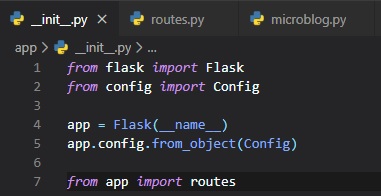
In case you're confused about why it seems as though I'm importing something from itself, seeing as
"flask" and "Flask" or "config"
and "Config" seem like the same things, just know that I'm referring to the uppercase ones as their
respective classes, whereas
"flask" and "config" are modules (like the file "config.py").
User Login Form
The Flask-WTF extension uses Python classes to represent web forms. A form class just defines the
fields of the form as class
variables. To implement this new feature, we're going to be creating a new file called "forms.py"
inside of the "app" folder.
This user login form will include: username, password, a "remember" me check box, and a submit
button.
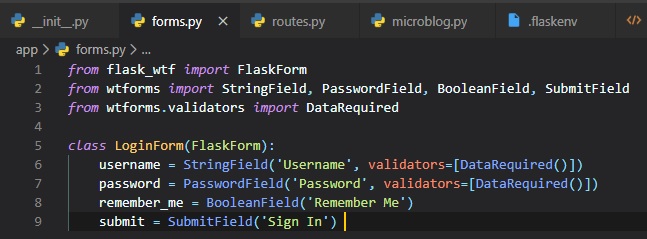
The four classes that represent the field types that we're using for this form are imported directly
from the WTForms package,
since the Flask-WTF extension doesn't provide customized versions. For each field, an object is
created as a class variable in
the LoginForm class. Each field's given a little description or label as a first argument.
The optional validators argument that you see in some of the fields is used to attach validation
behaviors to fields. The
DataRequired validator simply checks that the field isn't submitted emtpy. There's many more
validators available, some of
which we're going to use in future forms.
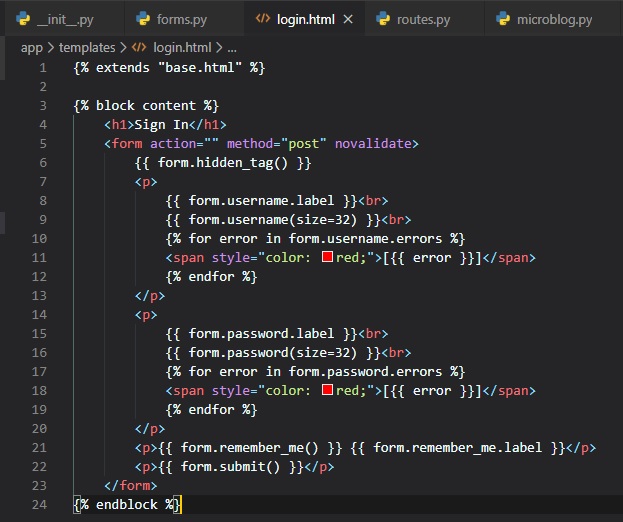
Form Templates
Now, that we have a functional back-end for the user login form, our next step is to add the form to
an HTML template so that
it can be rendered on a web page. For this, we're going to make a new HTML5 file inside the
"templates" folder called "login.html".
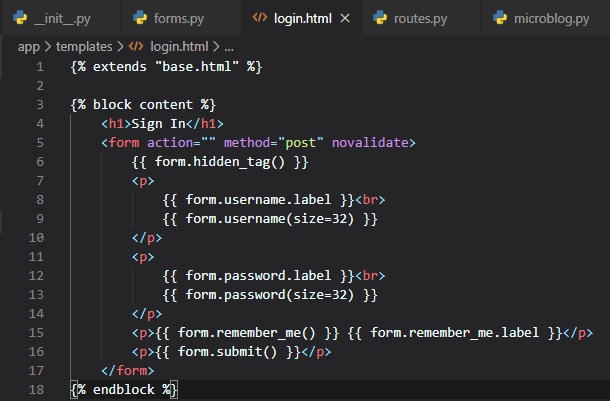
For this template, we're using the "base.html" template once again. This templates expects a form
object isntantiates from the
LoginForm class to be given as an argument, which you can see referenced as "form". This argument
will be sent by the login view
function, which isn't written yet in the "routes.py" file.
The HTML "form" element in <> is used as a container for the web form content. The "action" attribute
of the form is used to tell
the browser the URL that should be used when submitting the information the user entered in the
fomr. When the action is set to an
empty string, the form is submitted to the URL that is currently in the address bar, which is
the URL that rendered this form on
the page. The "method" attribute specifies the HTTP request method that should be used when
submitting the form to the server. The
default is to send it with a GET request, but in almost all cases, using a POST request makes
for a better user experience because
requests of this type can submit the form data in the body of the request, while GET requests
add the form fields to the URL, cluttering
the browser address bar.
The "form.hidden_tag()" template argument generates a hidden field that includes a token that's used
to protect the form against CSRF
attacks. All you need to do to have the form protected is include this hidden field and have the
SECRET_KEY variable defined in the
Flask configuration.
The form object calls the fields as methods, and they're already programmed to know how to render
themselves as HTML code. {{ form.field_name.label }}
is used to include the field label, and {{ form.field_name() }} is used to get the field. For fields
that require additional HTML
attributes, those can be passed as arguments. The username and password fields in this template take
the "size" as an argument that'll
be added to the "input" HTML element as an attribute. This is how you can also attach CSS classes or
IDs to form fields.
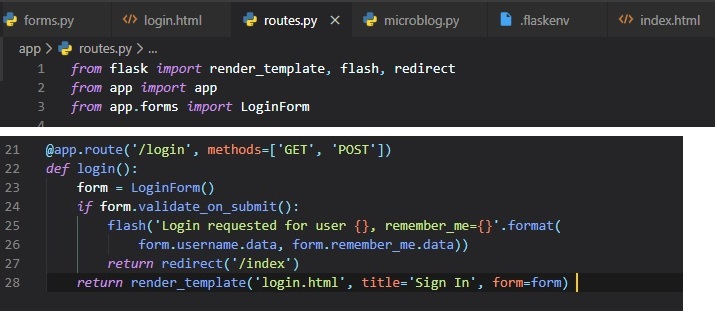
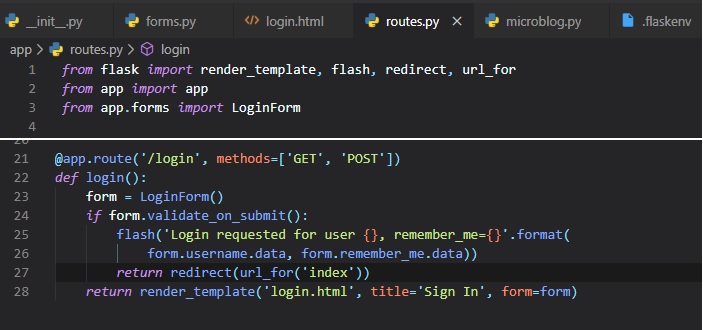
Form Views
Finally, we have to code a new view function in the application that renders the template made. This
is done in the "routes.py" file.
We're going to make another view function right below the previous one and import the LoginForm
class from the "forms" file inside of the "app"
folder.
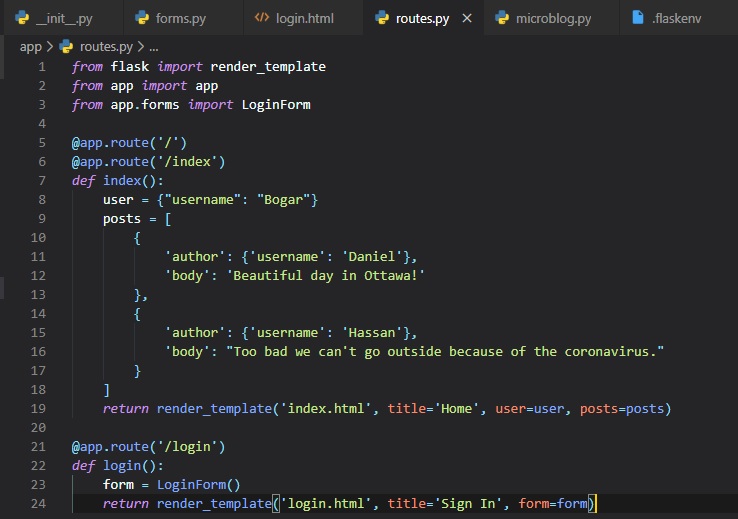
Here, we've instantiated an object of the LoginForm class form the "forms.py" file, and sent it to
the template. The "form=form" syntax
means that it's passing the "form" object created in the line above to the template named "form".
Now, we just need to add another
hyperlink on the top of every file to the new login page. All we need to do for this is to add it to
the base.html file, for all
other template to inherit form, making it so all templates have this new hyperlink.
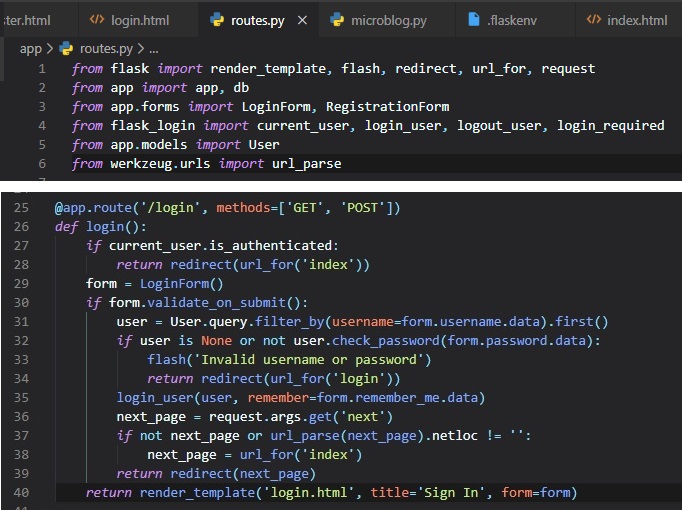
Receiving Form Data
As of right now, if you try hitting the submit button, the browser's going to display a "Method Not
Allowed" error. This is because
the inside the login view function, the submit button has no logic in place yet to process data
submitted by the user yet. So, we're
now going to be accepting and validating the data submitted by the user in this updated view
function. Also, there are new modules to
import at the top of the file.
The first new thing in this version, though, is the "methods" argument in the route decorator. This
tells Flask that this view
function accepts both GET and POST requests, overriding the default, which is to accept only GET
requests. The HTTP states that
GET requests are those that return information to the client (the web browser). All the requests in
the application so far are of
this type. POST requests are typically used when the browser submits form data to the server. Now
that we've enabled "POST" requests,
the "Method Not Allowed" error should be all fixed.
The "flask()" function, imported from Flask, is a useful way to show a message to the user. This is
only a temporary solution for our
application, though, since we don't have a system setup to actually log users in yet.
Although, the "flash" messages don't automatically appear in the browser, so we need to set up a way
for these
messages to display in the "base.html" file itself.
Here, similarly to how you'd do it in Python, we use a "with" construct to assign the result of
calling the "get_flashed_messages"
function to a messages variable. The conditional after this checks if "messages" has content, and if
it does, displays them in an
unordered list.
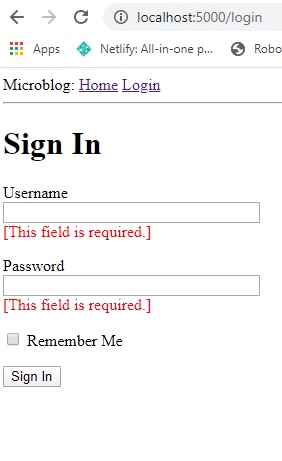
Improving Field Validation
We're now going to tell the user which fields they're incorrectly supplied data into in the login
form, using style in the "login.html" page.
Now, if you try submitting the form with an empty username or password, this is what'll occur on your
browser tab:
Generating Links
Before leaving off this chapter, I'd like to talk about making links better in your application.
Let's say, for instance, you
decide to reorganize your link names, or just don't want to bother with having to remember them all
by name. Well, you can
simply use the "url_for()" method from Flask that will provide the link for certain pages. You'll
see this in the following two
files below:
- base.html
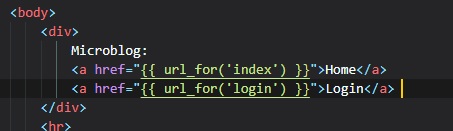
- routes.py
Flask Databases
Flask doesn't actually support databases natively. This means you'll have the freedom to choose the
database that best fits.
There are two groups of databases, those that follow the relational model, and those that don't.
Ones that are relational
implement the popular relational query language SQL, and those that don't are called NoSQL.
Relational databases are a better
match for application that have structured data such as lists of users, blog posts, etc. while NoSQL
databases are better for
applications with less defined structure. We're going with a relational one.
An extenstion we'll need to install is called "Flask-SQLAlchemy", which provides a Flask-friendly
wrapper to the popular SQLAlchemy
package, which is an Object Relational Mapper or ORM. ORMs allow applications to manage a database
using high-level entities such
as: class, objects, and methods, instead of tables and SQL. ORMs translate high-level operations
into database commands.
To install this package into your virtual environment, execute this command in your terminal window:

Database Migrations
Database migrations address the issue of trying to make updates to an existing database as the
application needs to change. This is
often difficult, seeing as relational databases are centered around structured data, so when the
structure itself changes, the data
that's already in the database needs to be migrate to the modified structure.
So, the next extension we'll need to help with that is Flask-Migrate, created by Miguel Grinberg, the
guy who wrote the blog I'm
basing this write-up on. To install it, type in this command:

Configuring Flask-SQLAlchemy
During development (as opposed to production), we're going to use a SQLite database. These are
convenient for developing small
applications. We now have two new configuration items to add to the config file:
This new extension takes the location of the application's database from the
"SQLALCHEMY_DATABASE_URI" config variable. Just like
we saw in Chapter 3, it's a good practice to set configuration from
environment variables, and provide a
fallback value as the second parameter in case the environment doesn't define the variable. We're
actually configuring a database
named app.db located at the top level of the application, which is stored in the basedir variable.
This file will be automatically made
for us later, once we create the database.
The "SQLALCHEMY_TRACK_MODIFICATIONS" configuration option is set to False to disable a feature of
Flask-SQLAlchemy that's not needed.
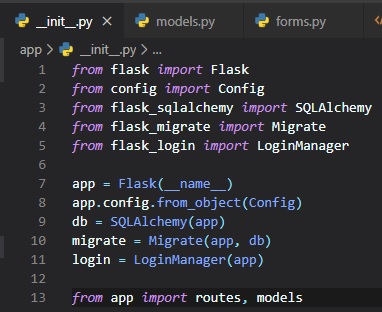
The database is going to be represented in the application by the database instance. The database
migration engine will also have an
instance. These are objects that need to be created after the application, in the "__init__.py"
file.

These are all the changes we've made to the init script:
- Imported a couple more modules at the top of the file
- We've added a db object that represents the database
- We've added another object that represents the migration engine
- Imported a new module called "models" at the bottom of the file, that will define the structure
of the database
Database Models
The data that'll be stored in the database will be represented by a collection of classes, usually
called database models.
Here I've made a model that represents users in a table. I did this using the
WWW SQL Designer Tool. It includes the fields, field datatypes, and field sizes.
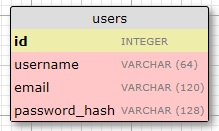
The id field is typical to all models, and is used as the primary key. Each user in the database will
be assigned a unique id value,
stored in this data field. Primary keys are, in most cases, automatically assigned by the database,
so we just need to provide the
field to house them in.
The other three fields for: username, email, and password_hash are defined as strings (or "VARCHAR"
in
database lingo), and their
maximum lengths are specified so that the database can optimize its memory usage (which is important
to do in computer science).
While the "username" and "email" fields are self-explanatory, the "password_hash" one has a little
more to it. It is used for security
reasons so that passwords get 'hashed' by the database they're stored in, as to not be vulnerable to
an attack. Although, this'll be done
in Chapter 5.
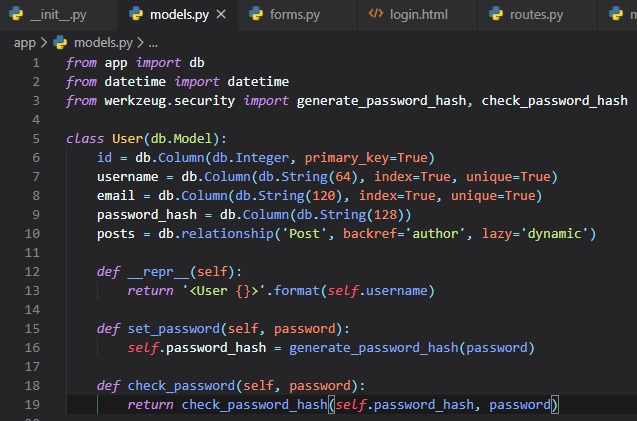
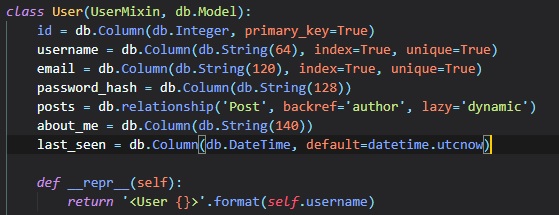
Now, let's go ahead and make a new file under the "app" folder and call it "models.py".
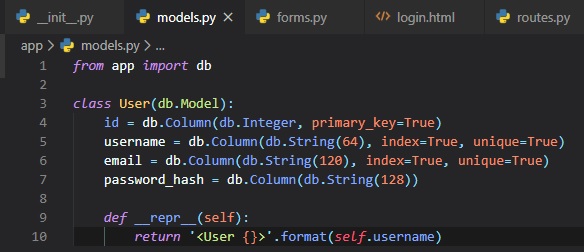
The "User" class created above inherits from "db.Model", which comes from Flask_SQLAlchemy and is its
base class. This class defines
several attributes. Fields are created as instances of the "db.Column" class, which takes the field
type as an argument, plus other
optional arguments, for example, allow us to indicate which fields are unique and indexes, which is
important so that database searches
are efficient.
The "__repr__" method tells Python how to print objects of this class, which is going to be useful
for debugging.
Migration Repository Creation
The model class created defines the initial database structure for this application, but as the
application continues to grow, there's
going to be a need to change that structure, whether that's adding, modifying, or removing items.
Alembic (the migration framework used by
Flask-Migrate), maintains a migration repository, which is a directory in which it stores its
migration scripts. Each time a change is
made to the database structure, a migration script is added to the repository with the details of
the change.
The "flask db" sub-command to Flask's commands, added by Flask-Migrate manages everything related to
database migrations. So, lets' create
the migration repository for microblog by running this command:

After running this command, you will find a new migrations directory, with a few files and a versions
sub-directory inside.
First Database Migration
This first migration will include the users table that maps the "User" database model. How Alembic
normally creates a database migration
is automatically. To generate a migration automatically, Alembic compares the database structure as
defined by the database models,
against the actual database structure currently used in the database. It then populates the
migration script with the changes necessary
to make the database schema match the application models. In this case, since there is no previous
database, the automatic migration will
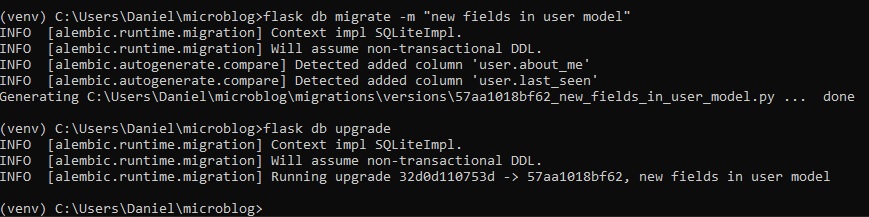
add the entire "User" model to the migration script. The "flask db migrate" sub-command generates
these automatic migrations:
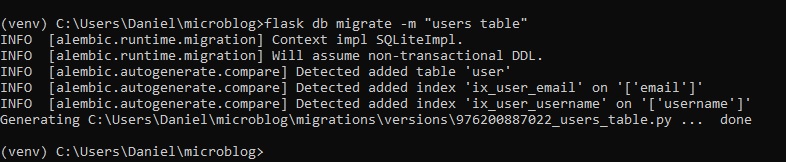
The -m "(...)" part is optional, but it adds a short descriptive text to whatever migration you're
currently implementing. The output of the
command gives you an idea of what Alembic included in the migration. The first two lines are
informational and can usually be ignored. It
then says that it found a user table and two indexes. Then it tells you where it wrote the migration
script. The 976200887022 code is an
automatically generated unique code I got for the migration.
This migration script has two functions "upgrade()" and "downgrade()" to apply or remove migrations.
This command must be used after migrating
a new script to the database:

Database Relationships
Relational databases are good at storing relations between data items, hence their name. Consider the
case of a user writing a blog post.
The user will have a record in the "users" table, and the post will have a record in the "posts"
table. The most efficient way to record
who wrote a given post is to link the two related records.
Once a link between a user and a post is established, the database can answer queries about this
link, like which user wrote a
certain blog post. This would actually be a pretty easy one, but one where you try finding the
reverse would be complex. If you
have a user, you may want to know all the posts that this user has written. Flask-SQLAlchemy will
help with both types of queries.
Now, I've expanded the database diagram to show the link between a user's id field and a post's
user_id field. Sounds confusing, but
that's because it is. Later on, in Chapter 8, it'll get even harder when we
introduce followers. However, this
stuff about database relationships is very good to know, considering it's taught in university
computer science classes. For right now,
though, I hope you can follow, since I don't think it's too complex just yet.
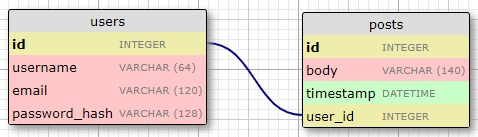
The "posts" table will have the required "id", the "body" of the post and a "timestamp". In addition,
though, is a "user_id" field, which
links the post to its author. The way to link a blog post to the user that authored it is to add a
reference to the user's "id", and
that's exactly what the "user_id" field's for. The "user_id" field is called a foreign key. The
database diagram above shows foreign
keys as a link between the field and the "id" field of the table it refers to. This kind of
relationship is known as a "one-to-many",
because 'one' user writes 'many' posts.
Seeing as we now have another database table, we need to add a new corresponding class to the
"models.py" file for the posts.
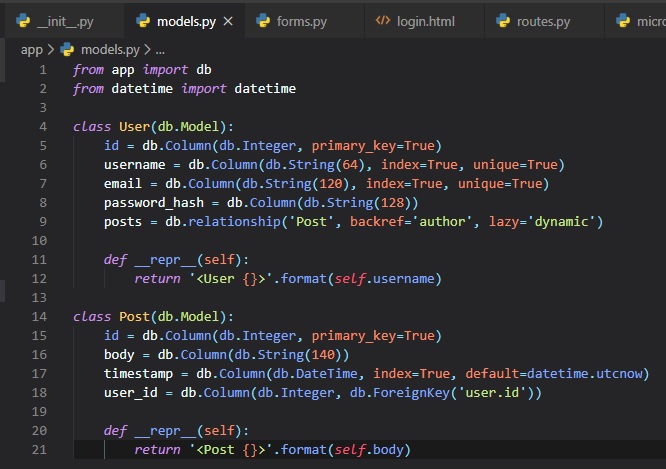
The new "Post" class will represent blog posts written by users. The "timestamp" field is going to be
indexed, which is useful if
you want to retrieve posts in chronological order. We're also added a "default" argument, and passed
the "datetime.utcnow" function.
When you pass a function as a default, SQLAlchemy will set the field to the value of calling that
function. This is done by not including
the (), to signal that we don't want the value from calling that function, rather the function
itself to be passed. In general, we want
to be working with UTC dates and times in a server application. This ensures that you're following
the standard regardless of where
the users are located. These timestamps will be converted to the user's local time when they're
displayed.
The "user_id" field was initialized as a foreign key to "user.id", which means that it references an
"id" value from the users table.
In this reference the "user" part is the name of the database table for the model.
The "User" class now also has a new "posts" field, that is initialized with "db.relationship". This
is not an actual
database field, but a high-level view of the relationship between users and posts, and for that
reason it isn't in the
database diagram. For a "one-to-many" relationship, a "db.relationship" is normally defined on the
"one" side, and is
used as a convenient way to get access to the "many".
The "backref" argument defines the name of a field that will be added to the objects of the "many"
class that points back at the
"one" object. This will add a "post.author" expression that will return the user given a post. The
"lazy" argument defines
how the database query for the relationship will be issued, which will be discussed later.
With a new update to the application models, a new update to the database migration needs to be made.

Now, for the upgrade command to finish it off:

Testing Time
After suffering all this time trying to get the database setup, it's time to see how it all works. We
could do this in the Python
interpreter, but the problem with that is: we would have to import our libraries before testing
inside the interpreter. A fix to
this is something the "flask shell". It is an exact copy of the Python interpreter, only it imports
things from the "microblog.py"
app for you by making a function for it in that file.
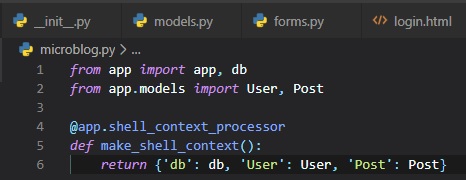
Now, with these configured symbols to pre-import before heading into the shell, we don't have to
worry about doing it ourselves.
Also, with the shell, comes the application instance pre-imported, which means that anything in the
"app.db" file for our database.
The first step is getting into the shell by running the flask command.

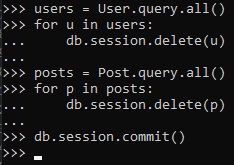
Now that we're in, it should look exactly like the Python intrepreter. Let's start testing by
creating a new user.

Changes to a database are done in the context of a session, which can be accesses as "db.session".
Multiple changes can be
accumulated in a session and once all the changes have been registered you can issue a single
"db.session.commit()" command. If
at any time while working on a session there's an error, a call to "db.session.rollback()" will
abort the sesison and remove any
changes stored in said session.
With all that said, let's add another user.

Now that we have 2 users in our database, we can ask a query that returns all the users.
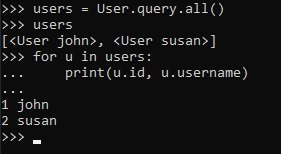
All database models have a "query" attribute that's the entry point to run database queries. The most
basic query is
that one that returns all elements of that class. Also, since we indexed the "username" field, the
"id" fields were automatically
set to 1 and 2 when they were added.
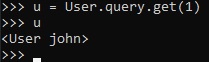
However, instead of doing a query to retrieve all users in a database, you can also locate one using
the "id" of that user.
Now, let's add a mock blog post.
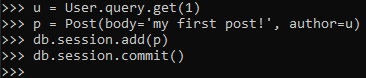
Since, we set a default value for the "timestamp" class attribute, we don't need to set it. As for
the "user_id" field, we have a
"db.relationship" setup between the "User" class and the post, because the class adds a "posts"
attribute to users, and also an
author attribute to posts. We went about assigning an turho to this post using the "author" virtual
field instead of having to deal
with user IDs, which we don't have setup yet.
Now, to end this chapter off, we need to clean the shell so that there's no existing users and posts
in our database for chapters to come.
Password Hashing
Time to address the "password_hash" field of the user model, that's gone unused thus far. The purpose
of this field is to contain
a hash of the user password, which will be used to verify the password entered by the user during
login. Although, password hashing
is pretty complicated and advanced, there's several libraries to help us with that.
Werkzeug, is a package we're going to implement to set and check a password. This'll be done in the
"models.py" file under two functions
inside of the User class.
These two methods are pretty self explanatory by reading the function names inside of them. Just
don't forget to import the two packages from
werkzeyg.security.
Introduction To Flask-Login
This popular Flask extension manages the user's logged-in state. This also provides the "remember me"
functionality that allows users
to remain logged in even after closing the browser window. The first step to all of this though, is
to - you guessed it, execute the install
command in the terminal for the extension.

As with other extensions, Flask-Login needs to be created and initialized right after the application
instance in "__init__.py". This is how:
User Model Setup
The Flask-Login extension works in tandam with the application's user model, and expects certain
properties and methods to be
implemented in it. The four required items are listed below:
- "is_authenticated": a property that's True if the user has valid credentials or False otherwise
- "is_activate": a property that's True if the user's account is activate or False otherwise
- "is_anonymous": a property that's False for regular users, and True for a sepcial, anonymous
user
- "get_id": a method that returns a unique identifier for the user as a string
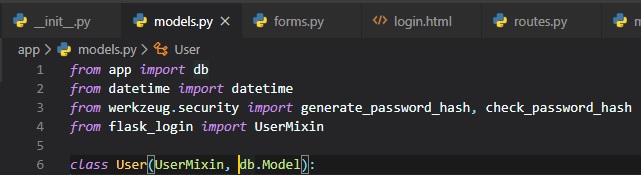
These four items are simple to implement, but since since they're fairly generic, Flask-Login
provides a class called "UserMixin". It's first
imported from flask-login, then added as a parameter to the "User" class.
User Loader Function
The way Flask-Login keeps track of the logged in user is by storing its unique identifier in Flask's
"user" session, a storage space assigned
to each user who connects to the application. Since, Flask-Login knows nothing about databases, we
need to configure a user loader function
for it to load a user given the ID. This function can be added in the "models.py" file.
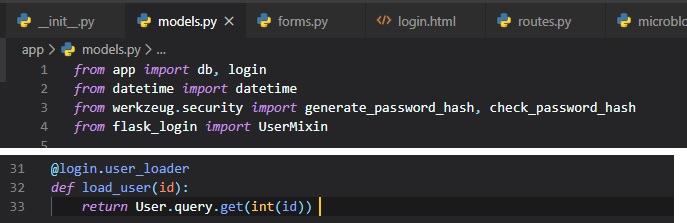
The "@login.user_loader" decorator on top of the function is what registers the user loader with
Flask-Login. The "id" that Flask-Login passes
to the function as an argument is going to be a string, so databases that user numeric IDs need to
convert the string to integer as you can see above.
Logging Users In
We are finally going to change the fake login that just issued a "flask()" message in the login view
function.
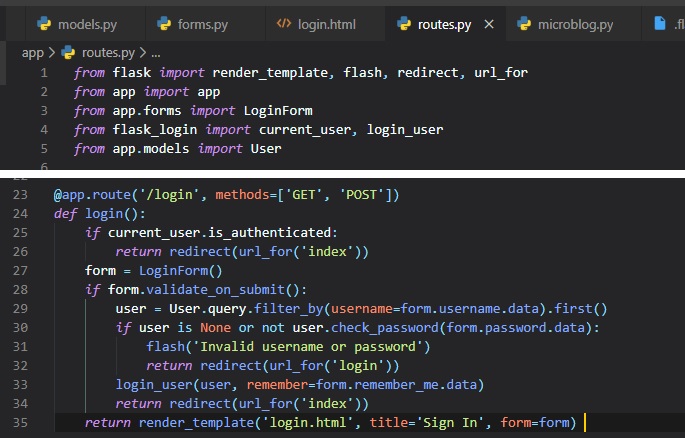
The first two lines are a solution to a weird situation. This would be if a user tried clicking on
the login button while already being
logged into your application. So, this condition uses the "current_user" variable from Flask-Login
to check if they're already
"authenticated" and redirects them to the "index" page if True.
In place of the "flash()" call that we used earlier, now we can actually log the user in. The first
step to load the user from the database.
The username came with the form submission, so we can query the database with that to find the user.
For this purpose we're using the
"filter_by()" method of the SQLAlchemy query object. The result of this method is a query that only
includes the objects that have the
matching username. Since we know there is only going to be one or zero results, the query is
completed by calling the "first()" command,
which'll return the user object if it exists, or None if it doesn't.
If the username match was successful, we can then check if the password that also came with the form
is valid. This is done by calling the
"check_password" method defined above. This will take the password hash stored with the user and
determine if the password entered in the
form matches the hash or not. So now we have two possible error conditions:
- The username can be invalid
- The password can be incorrect for the user
Either way, a message is flashed, and the user gets redirected back to the login prompt so that the
user can try logging in again.
If both fields are correct, then we can call the "login_user()" function, which comes from
Flask-Login. Finally, the user's reidrected to
the "index" page of the web application.
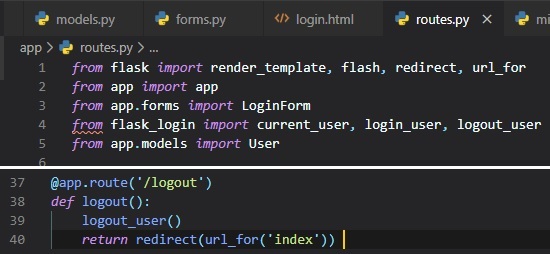
Logging Users Out
Flask has the "logout_user()" function already built in for us. All we have to do is add another view
function to the "routes.py" file
and another hyperlink in the "base.html" file.
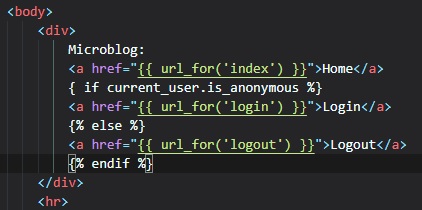
Now, all we have to do is add some pretty simple logic to our hyperlinks in the "base.html" file.
This is so that, if the user is already
logged in there'll be a "logout" button, but if they aren't, then there'll be a "login" button
instead. They aren't if "is_anonymous" is True.
Requiring Users To Login
Flask-Login provides a very useful feature that forces users to login before they can view certain
pages of the application. Flask-Login will
automatically redirect a user that's trying to access restricted content to the user login form, and
only redirect back to the page the user
was originally trying to access once they get logged in.
For this, we just need to let Flask-Login know about which view function that handles logins. This'll
be added in "__init__.py":

The 'login' valule above is the function (or endpoint) name for the login view. In other words, the
name you'd use in a "url_for()" call to
get the URL.
The way Flask-Login protects a view function against anonymous users is with a decorator called
"@login_required". When you add this decorator
to a view function below the "@app.route" decorators from Flask, the function becomes protected and
will not allow access to users that aren't
authenticated. Here's how the decorator can be applied to the index view function of the application
in the "routes.py" file:
What remains is to implement the redirect back from the successful login to the page the user wanted
to access in the first place. What we want to
have happen is if the user navigates to the "index" page, for example, the "@login_required"
decorator will intercept the request and respond with
a redirect to the "login" page, but it will add a query string argument to this URL, making the
complete redirect URL /login?next=/index. The
"next" query string argument is set to the original URL, so the application can use that to redirect
back after login.
Right after the user's logged in by calling Flask-Login's "login_user()" function, the value of the
"next" query string argument is obtained.
Flask provides a "request" variable that contains all the information that the client sent with the
requrest. In particular, the "request.args"
attribute exposes the contents of the query string in a dictionary format. There's actually three
possible cases that need to be considered to
determine where to redirect after a successful login:
- If the login URL, doesn't have a "next" argument, then the user is redirected to the index page
- If the login URL includes a "next" argument that's set to a relative path (or in other words, a
URL without the domain portion), then
the user is directed to that URL
- If the login URL includes a "next" argument that's set to a full URL that includes a domain
name, then the user's redirected to the index page
The first two cases are self-explanatory. The third case is in place to make the application more
secure. An attacker could hypothetically
insert a URL to a malicious site in the "next" argument, so the application only redirects when the
URL is relative, which ensures that the
redirect stays within the same site as the application. To determine if the URL is relative of
absolute, we parse it with Werkzeug's "url_parse()"
function and then check if the "netloc" component is set or not.
Showing Logged-In Users
Instead of using fake users on the homepage, we can now use Flask-Login's "current_user" in the
template.
Also, we can remove the "user" template argument in the view function.
User Registration
Now, so we can see our work in action, we need a way to register some users on our website! To do
this, we need to make a new web form class
in "forms.py".
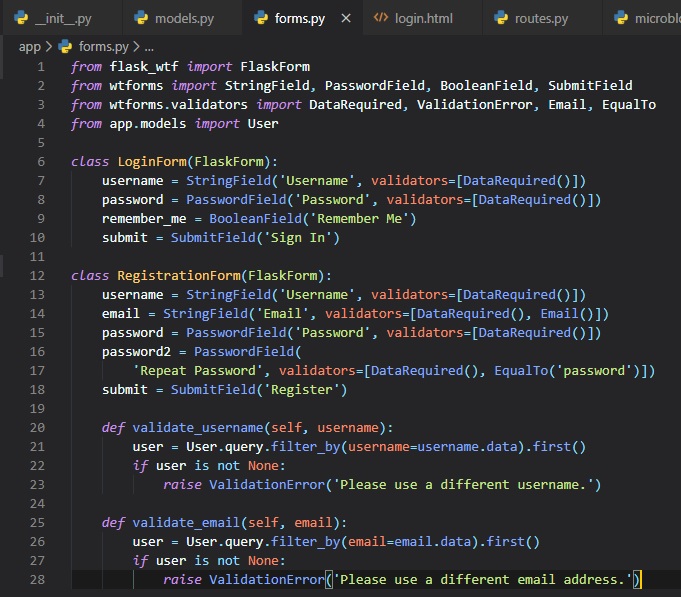
There is now a second validators to the "email" field after "DataRequired" called "Email". This is
another stock validator that comes with WTForms
that'll ensure that what the user types in this field matches the structure of an email address.
Since this is a registration form, it is customary to ask the user to tyep the password twice to
reduce the risk of a typo. For that reason
we have two password fields, that'll then be checked by another stock validator called "EqualTo" to
ensure they're the same - or equal to each other.
We've also added two methods to this class called "validate_username" and "validate_email()". In this
case, we want to make sure the username and email
address entered by the user aren't already in the database. If they are, there'll be a
"ValidationError" raised. The message included as the argument
in the exception will be the message that'll be displayed next to the field for the user to see.
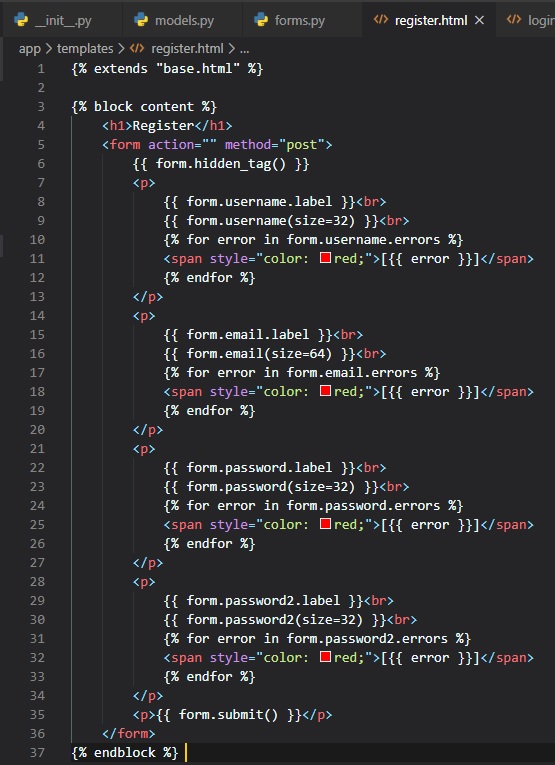
To display this form on a web page, we need another HTML template, which is going to be called
"register.html" and will go inside the "templates" folder.
Now, the login template needs a link that sends new users to the registration form, right below the
form, in the same file.

Now, to add another view function for registration.
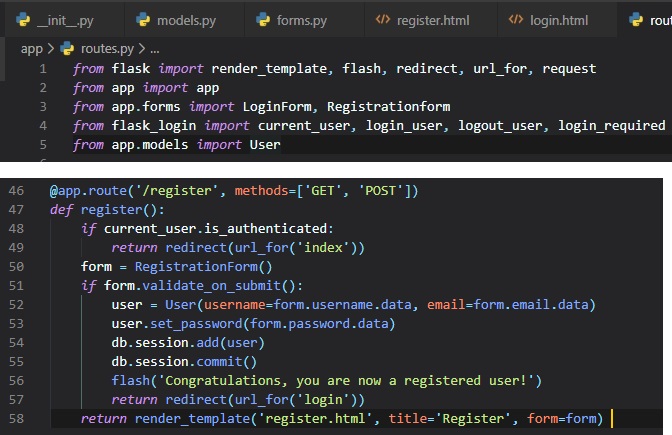
Pretty self-explanatory, but I'll explain just in case. We first make sure the user that goes to this
route isn't logged in. The form is handled
in the same way for the one for loggin in. The logic that's done inside the "if
validate_on_submit()" conditional creates a new user with the
username, email and password provided, writes it to the database, and then redirects to the login
prompt so that the user can login.
You can now go ahead and test it out if you want, by creating an account on this application, logging
in, and out. Make sure to try out all
the validation features we've added to better understand how they work.
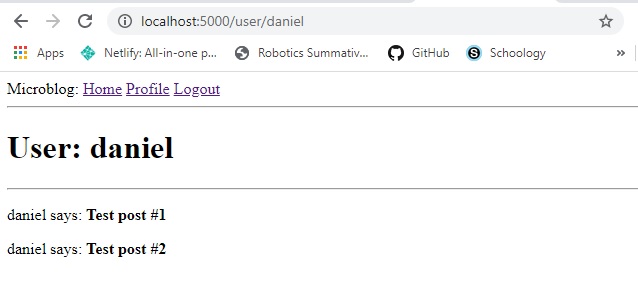
User Profile Page
Let's start of with a new view function that maps to the "/user/(username)" URL in the "routes.py"
file.
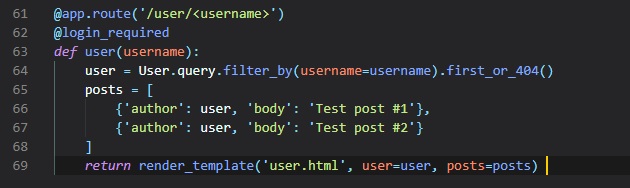
In this @app.route decorator used to declare this view function, we have a dynamic component in it,
which is indicated as the /username
URL component that's surrounded by < and>. When a route has a dynamic component, Flask will accept
any text in that portion of the
URL, and will invoke the view function with the actual text as an argument. For example, if the
client browser requests URL /user/susan,
the view function is going to be called with the argument "username" set to 'susan'. Since, we
only want logged in users to access
this view function, we've added the @login_required decorator from Flask-Login
We simply do the same as we did earlier, trying to load the user from out database using a query by
the username, and if it's not found
as "first()", then a 404 error will occur in the browser. Then, if successful, we initialize a fake
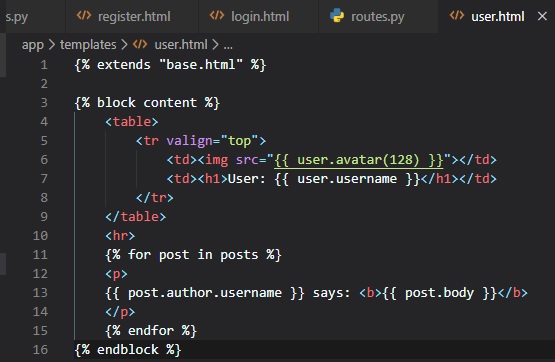
list of posts for this user.
Although these need to be rendered in a new "user.html" template file.

Finally, we need to add another link to our "base.html" file's links div.
Here, we're just using Flask-Login's "curernt_user" to generate the correct URL inside of the
"url_for()" function's parameters.
This is to point to the right view function in "routes.py" for the appropriate user.
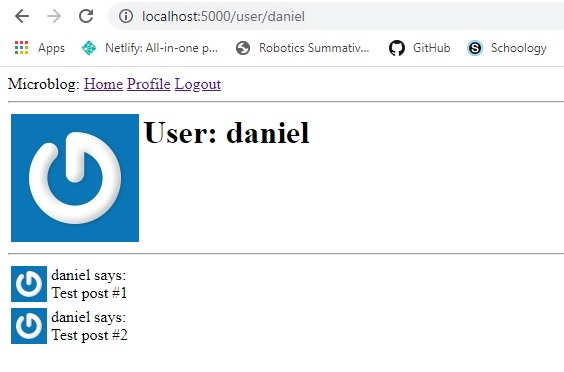
Feel free to test out the application now. This is what you should see once you've registered a user,
logged in, and clicked on the
profile hyperlink:
Avatars
So far the profile pages we've made for users are pretty boring. Well, it's time to change them up
with some avatars. To do this,
we'll be using the Gravatar service to provide images for all users, instead of having a possibly
large collection of uploaded images
in the server.
The Gravatar service is very simple to use. To request an image for a given user, a URL iwth the
format "https://www.gravatar.com/avatar/(hash)",
where "hash" is the MD5 hash of the user's email address. More on this later in the code.
By default the image size returned is 80x80 pixels, but a different size can be requested by adding
an "s" argument to the URL's
query string in the URL. Another argument that can be passed to Gravatar as a query string is "d",
which determines that image
Gravatar provides for users that don't have an avatar registered with the service.
Note that if you don't see avatars in your browser, it may be due to an extension that you've
installed in your browser.
Now, we're just going to add an "avatar" method to the "user" class with the "self" and "size"
parameters.

This method returns the URL of the user's avatar image, scaled to the requested size in pixels. If
they don't have one registered,
it'll generate an "identicon" image, an image that'll look different for every user based on their
email hash.
To generate the MD5 email hash, the email first gets converted to lowercase by calling Python's
"lower()" function. Then, because the
MD5 support in Python works on bytes and not on strings, we encode the string as bytes before
passing it on to the hash function.
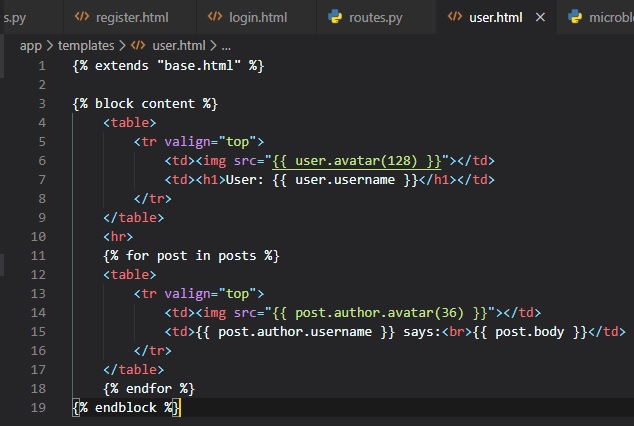
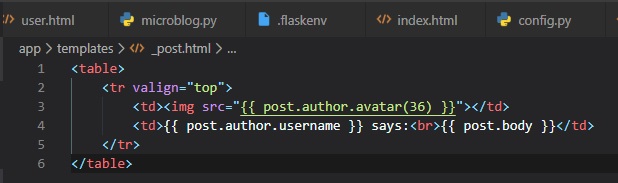
Next up, is inserting the avatar images in the user profile template.
Now, we have a big avatar next to the user name on the top of the page, but we could also use some
little avatars next to their
posts on the bottom. For this, we just need to make a small change to the template.
Now, if we test this out on our browser, it should look like this:
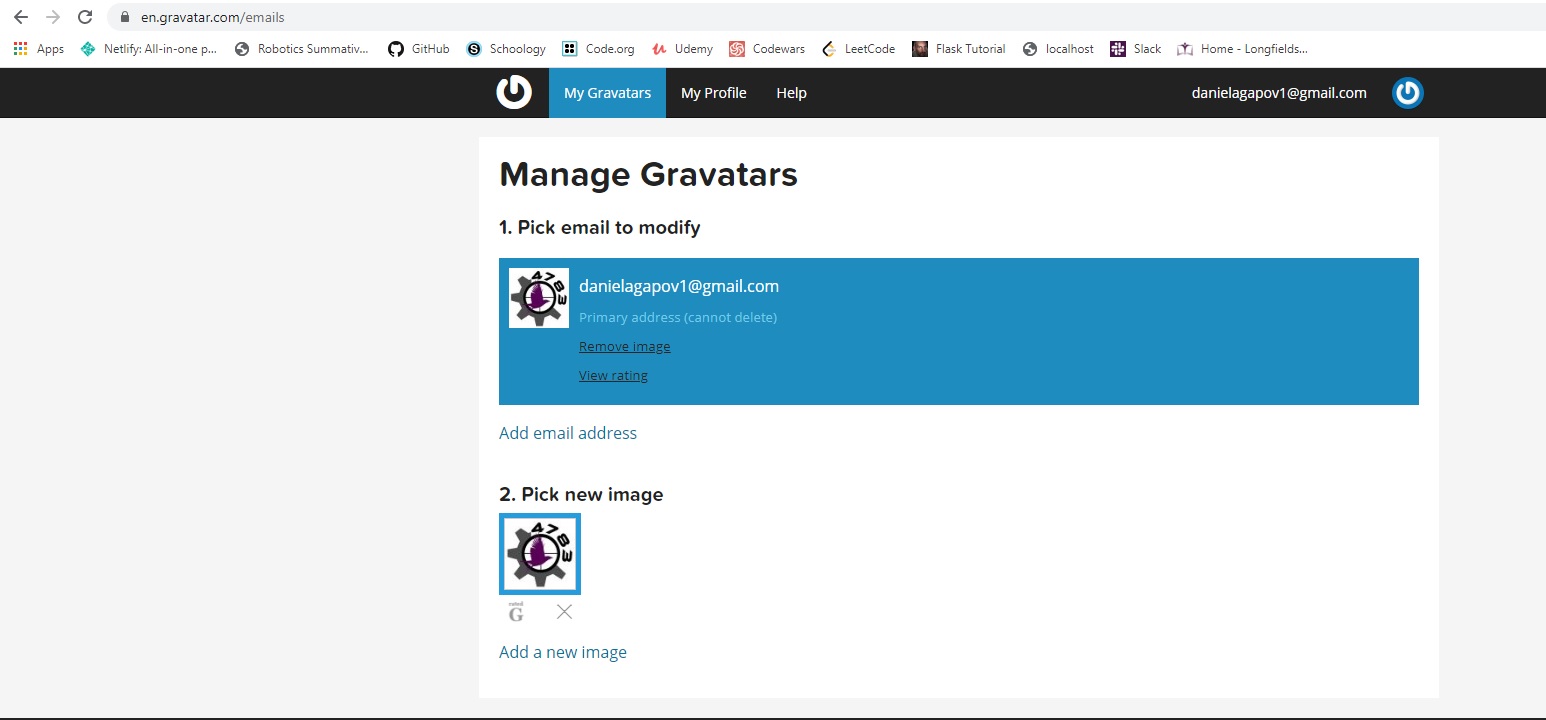
If you're interested in changing the avatars displayed on your website, just follow this link
and sign in with the same email used for your registered user on the web application. Then just
upload an image like I have here:
Jinja2 Sub-Templates
We now want for all posts written by the user to be displayed on the "index" page. To do this, we're
going to make a sub-template
that just renders one post, and then we're oging to reference it from both the "user.html" and
"index.html" templates. To begin,
we can create the sub-template, with just the HTML for a single post. We're going to be naming this
template "_post" in the "templates"
folder. The _ prefix to the name is just a convention used to describe sub-templates.
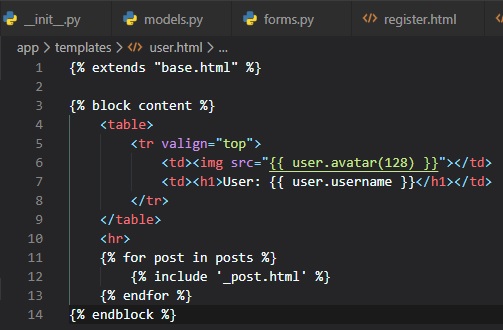
We're now going to include this sub-template into the "user.html" template using Jinja2's "include"
statement.
More Profile Additions
We're going to create "about me" and "last_seen" class attributes for the "user" in the "models.py"
file.
Now that we've changed the database structure, we need to generate a database migration, and then
apply this change to the database.
The next step, is to add these two new fields to the user profile template in its "user.html" file.
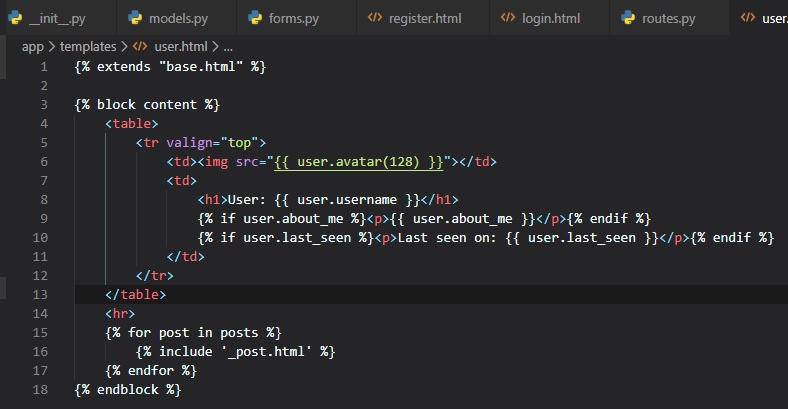
We're wrapping these two fields in Jinja2's conditionals, since we only want them to be visible if
they're set. Which, they won't be
if you fun the application now.
Recording The Last Visit Time
All we want to do for the "last_seen" field of the "User" class is write the current time on this
field for a given user whenever
that user sends a request to the server.
This new function in the "routes.py" file will execute a bit of generic logic ahead of a request to a
view function.
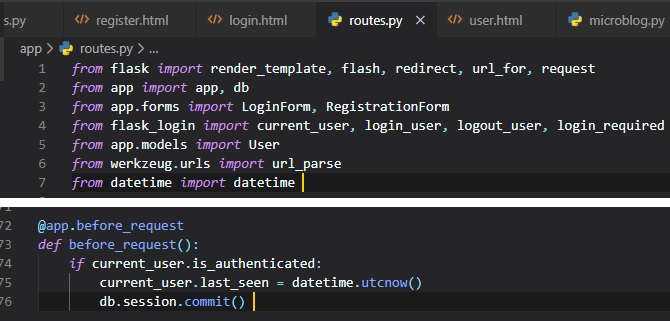
The "@before_request" decorator from Flask executes right before the view function. This means that
this code we've just typed up
will automatically be inserted before any view function in the application.
The "current_user" is already invoked in the database from referencing it earlier, making it so that
we don't need to run a "db.session.add()"
command before the commit.
Now, if you go check your profile, you'll notice this new feature implemented, and if you navigate
away from this page and come back, also
notice that it constantly updates.
Profile Editor
Now that we've added an "about_me" field to the "User" class, we need to give users a form in which
they can enter some information about
themselves. The form is going to let users change their username, and also write something about
themselves. So, let's now write a new
form class in the "forms.py" file.
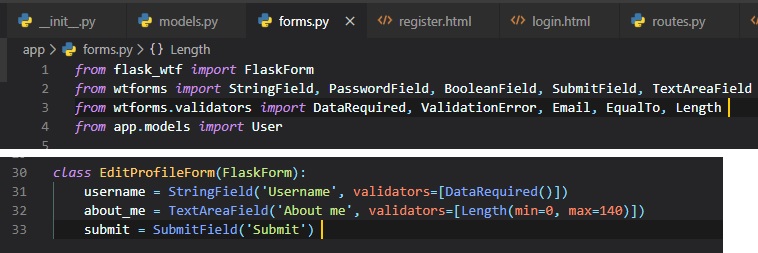
This new "TextAreafield" field type is used to provide a multi-line box in which the user can enter
text into. To validate this form,
we've also added the "Length" validator, which will make sure that the text entered is between 0 and
140 characters, which is the space
we've allocated for the corresponding field in the database.
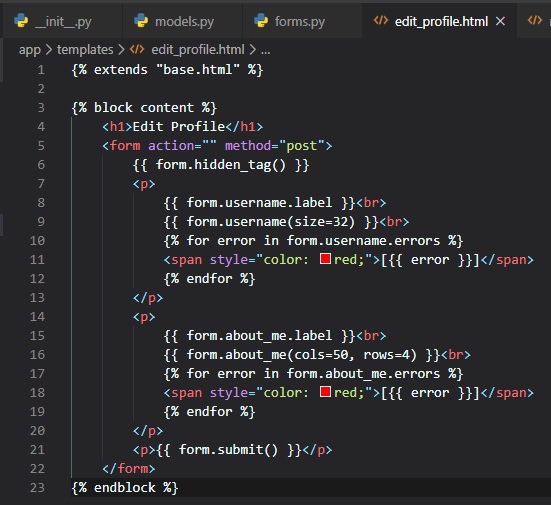
Now, for the new "edit_profile.html" file in the "templates" folder.
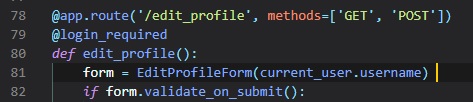
Finally, here's the view function that'll tie everything altogether:
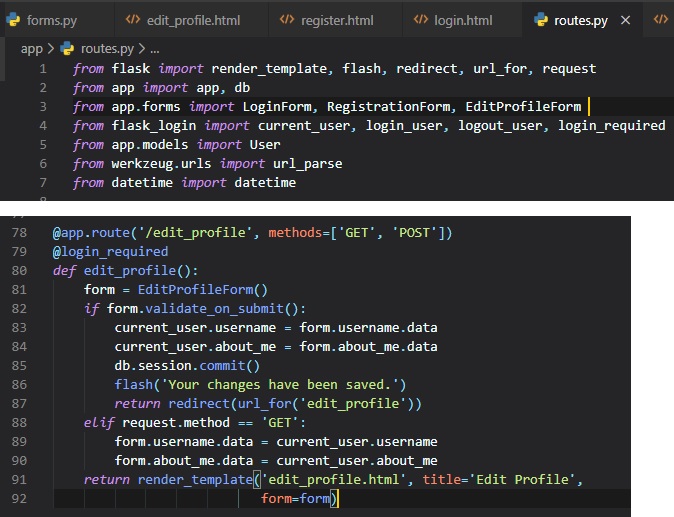
There's a few differences between this form and the other two we've previously made. If
"validate_on_submit()" returns True,
we copy the data from the form into the user object and then write the objec to the database.
However, when it returns False,
it can be due to 2 different reasons:
- It can be because the browser just send a "GET" request, which we need to respond by providing
an initial version of the form template
- It can also be when the browser sends a "POST" request with form data, but something in that
data is invalid.
For this form, we need to treat these two cases separately. When the form is being requested for the
first time with a "GET" request,
we want to pre-populate the fields with the data that's stored in the database, so we need to do the
reverse of what we did on
the submission case and move the data stored in the user fields to the form, as this will ensure
that those form fields have the current
data sotred for the user. In the case of a validation eror, though, we don't want to write anything
to the form fields, because those
were already populated by WTForms. To distinguish between these two cases, we check
"request.method".
To make this new page easily-accessible, we can add a link in their profile page.

We added this conditional beside it that that the link appears only when you're viewing your own
profile, but not when you're viewing
someone else's.
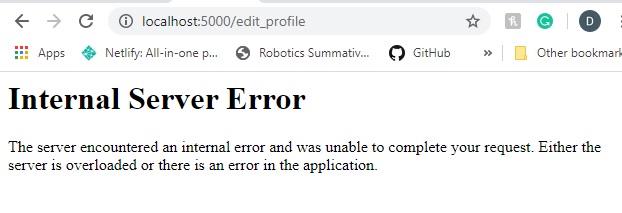
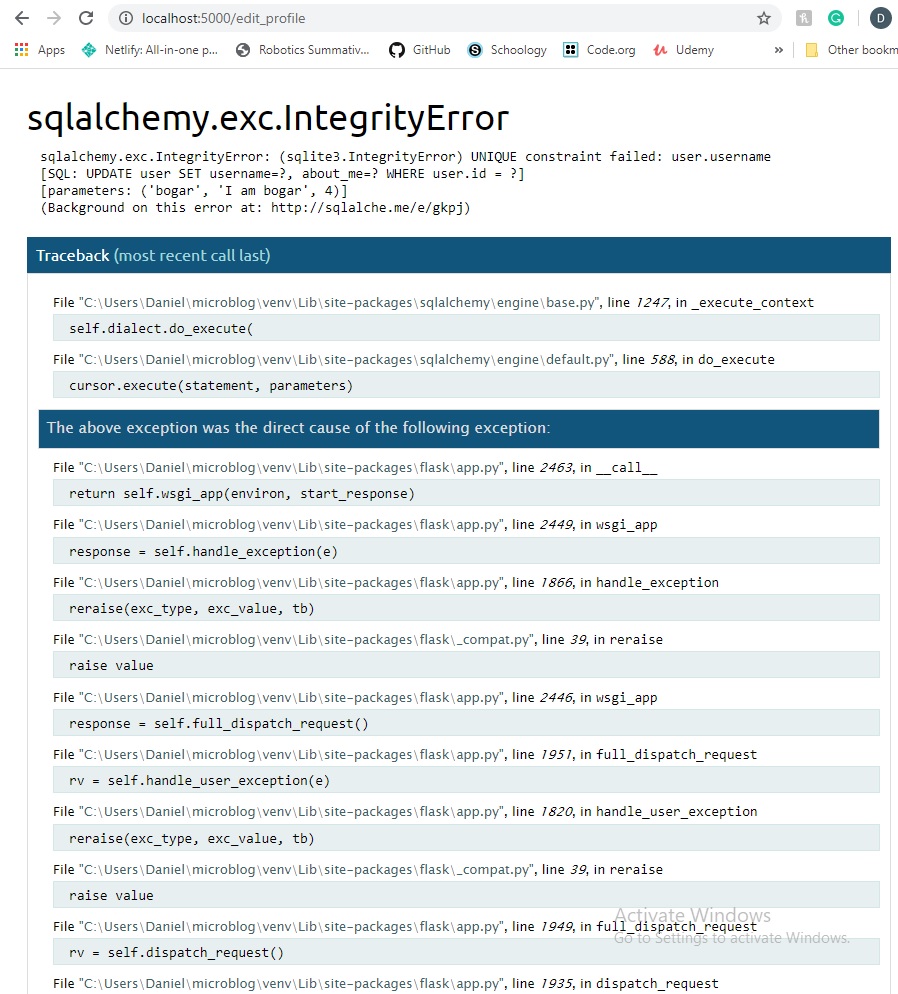
Flask Error Handling
As it stands right now, we have a little bug in our code. It occurs when there's two or more users
registered
on the website, you click on the edit_profile button, and then you try changing the username of
another user
that's alread registered. What'll happen now, is you'll see this message pop up in your browser:
This error will show a stack trace of itself in your terminal session. As well as, point to the line
it came from.
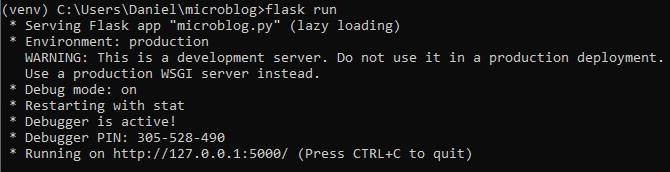
Debug Mode
Another thing you can see in the terminal that'll help with debugging errors is whether you have
Debug mode set to
"on" or "off". This can be changed by setting it to 1 (on) or 0 (off). This is how you do it on
Microsoft Windows:

On any other system (Mac or Linux), here's how to do it:

Now, if you run the appplication, the output will be slightly different, being that Debugger will be
activate and you'll
get a "Debugger PIN".
Now, if we make the application crash once more, you get to see the interactive debugger in your
browser, instead of terminal.
Custom Error Pages
Being that the two most common errors are HTTP errors 404 and 500, we're going to define custom pages
for them, although it'll work for any type of error.
To declare a custom error handler, the "@erorrhandler" decorator is used. We're going to put our
error handlers
in a new "errors.py" module inside of the "app" folder.
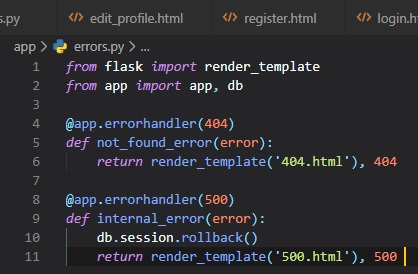
These error functions work very similary to view functions. For these two errors, we're returning the
contents
of their respective templates.
Note that both functions return a second value after the template and its arguments, which is the
error code number.
This is because, for all the view functions that've been created so far, we didn't need to add a
second return
value because the default of 200 (the status code for a successful response) is what we've wanted.
To make sure any failed database sessions don't interfere with any database accesses triggered by the
template,
we issue a session rollback. This resets the session to a clean state.
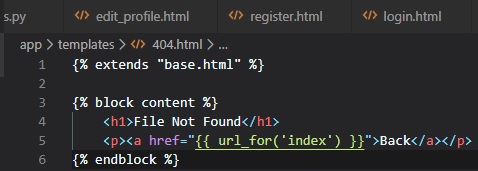
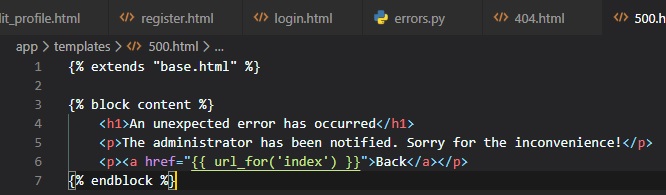
Here's the new template file called "404.html" inside of the "templates" folder:
Here's the other one for "500.html":
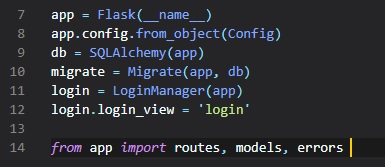
To get these error handlers registered with Flask, we need to import the "error.py" module after the
application instance is created in the "__init__.py" file.
Now, if you set "FLASK_DEBUG=0" again in your terminal session and then trigger the duplicate
username bug one more
time, you're going to see a more friendly error page.
Sending Error Emails
Constantly monitoring the terminal and see what errors occur that way is a hassle.
It's for that reason that we would want a feature implemented to just notify us by email, or at
least in a more convenient
manner than through the terminal.
Another reason for this, is because there won't be any output in the terminal while your web
application is desployed
in a production server, unlike in a development server, like what we've been using.
So, we want to receive an email with the error right away, along with the stack trace of the error in
the email body.
The first step is to add the email server details to the configuration file like so:
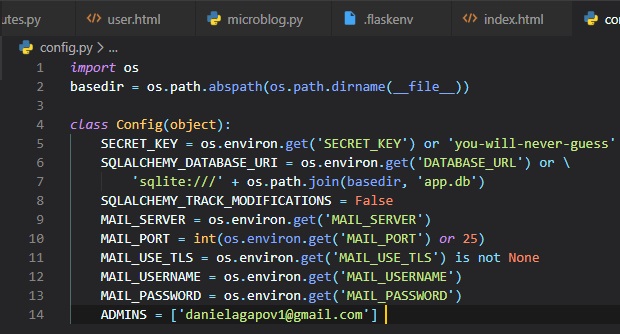
You can set the admins' emails to whichever you'd like, and have multiple of them in this list.
The configuration variables for email include:
- The mail server, which, if not set in the environment, will be used as a sign that emailing
errors needs to be disabled
- The mail port, that can also be given in an environment variable, but if not set, the standard
port 25 is used
- A boolean flag to enable encrypted connections using TLS (Transport Layer Security) from server
to server
- An optional username
- An optional password
Flask uses Python's "logging" package to write its logs, which already has the ability to send logs
by email.
All we need to do to get emails sent out on errors is to add a SMTPHandler instance to the Flask
logger object, which is "app.logger".
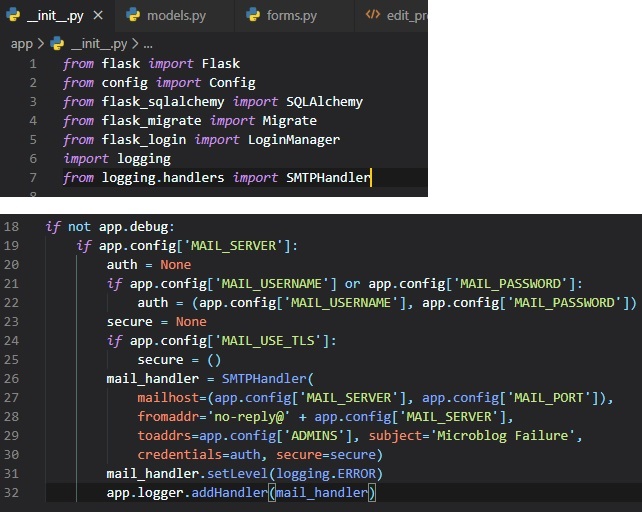
As indicated by "app.debug" being True, we'll only have the email logger enabled when the application
is running without
debug mode (on a production server), and also when the email server exists in the configuration.
In essense, the code above creates a STMPHandler instance, sets its level so that it only reports
errors and not warnings,
informational or debugging messages, and finally attaches it to the "app.logger" object from Flask.
Testing This Feature
There's actually two methods to testing out this feature that we'll see right below.
- First approach:
The easier one is to use the SMTP debugging server from Python. This is a fake email server that
accepts emails, but
instead of sending them, it prints them to the console. To run this server, open a second
terminal session and run
the following command on it:

Leave this debugging SMTP server running and go back to your first terminal and set the
"FLASK_DEBUG" variable to 0. Since,
the application won't send emails in debug mode. Again, this is how you do it on windows:

Remember that on Mac/Linux, you need to type "export" instead of "set".

Now, set the MAIL_SERVER=localhost and MAIL_PORT=8025 in the virtual environment.

Now, it's time to run the application and trigger the error once again, and see what arrives in
your email inbox.
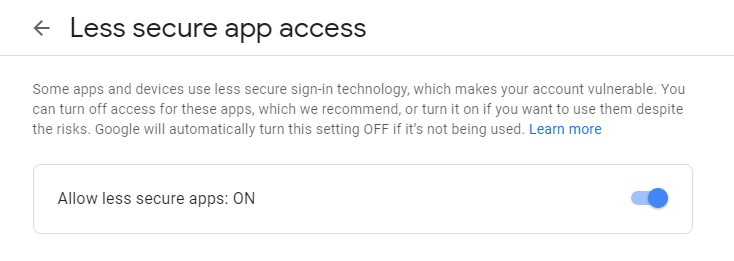
Don't worry if you didn't get an email, though. Since, your Gmail account may prevent the
application from
sending emails through it unless you explicitly allow "less secure apps" access to your Gmail
account. You should
get an email saying that there's a "Google Security Alert", which leads you to information on
how to allow this option.
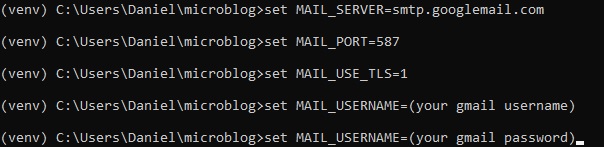
- Second approach
This second approach is a little bit harder, since you're configuring a real email server. Below
is the configuration
to use your Gmail account's email server.
Remember to use "export" instead of "set" if you're not on Microsoft Windows, and that it's okay
if you don't get an
email after running the application again and triggering the error.
Logging To Files
Receiving errors via email is okay, but having a file to store errors via logging is even better.
There's some
failure conditions that don't end in a Python exception and aren't a major problem, per say, but may
still be
useful to save for debugging purposes. For this reason, we're also going to maintain a log file for
the application.
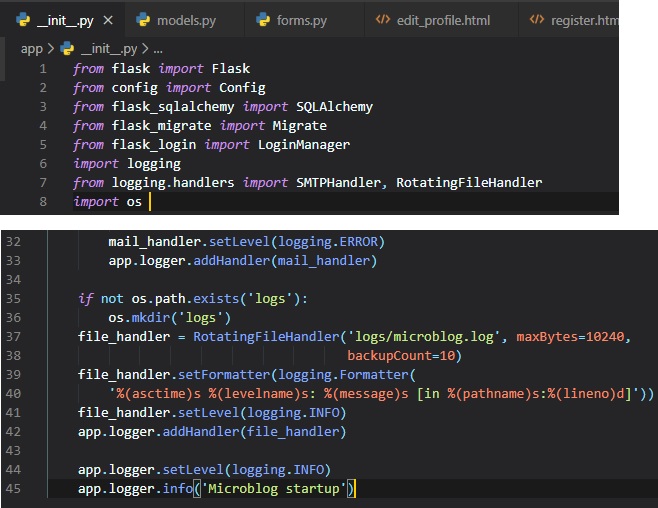
To enable a file based log, another handler, called "RotatingFileHandler", needs to be attached to
the
application logger, in a similar way to the email handler (SMTPHandler). This'll be done in the
"__init__.py" file.
We're going to be writing this into a file. Which, first means we have to create it. We've done this
by simply
using the "os" library in python (which deals with operating system things, like making directories
and such) to make
a new log file with the name "microblog.log" in the "logs" directory.
The "RotatingFileHandler" actually helps us deal with memory usage in this file. Seeing as it ensures
that
the log files don't grow too large when the application runs for a long time. In this case, we're
limiting
the size of the log file to 10KB, and we're keeping the last 10 log files as backup.
The "logging.Formatter" class provides custom formatting for the log messages. Since, these messages
are going to
a file, I want them to have as much information as possible. So, I'm using a format that includes:
- The timestamp
- The logging level
- The message
- The source file
- The line number from where the log entry originated
To make the logging more useful, and not just displaying the very blatant errors in our program,
we're lowered the
logging level to the "INFO" category, both in the application logger and the file logger handler. In
case you're
unaware with the logging categories, here they are in order from least to most severe:
- DEBUG
- INFO
- WARNING
- ERROR
- CRITICAL
When this application runs on a production server, there'll be log entries from the server indicating
each
time it starts in a line in the log file. These will tell you when the server was restarted.
Fixing The Bug
Now, that we have our error handling system all figured out for the future, let's focus on fixing the
error at hand.
Here in the "EditProfileForm" class inside of the "forms.py" file, we have to implement a username
validation. This'll
be much like the one in the "RegistrationForm", except that if the user leaves the original username
untouched,
then the validation should allow it, since that username is already assigned to that user form being
logged in.
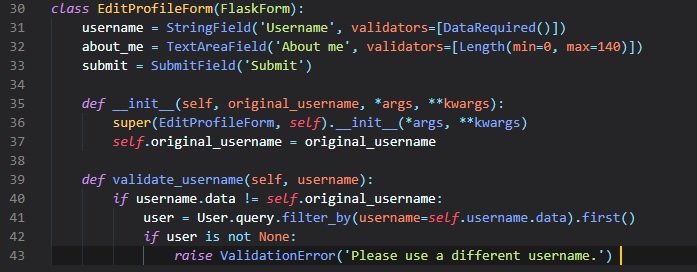
In the "validate_username" method, it takes the original usernamem as an argument, which was defined
in the __init__ method
above. This prevents from checking the database for duplicates if the username entered in the form
is the same
as the original username.
Now, we simply have to add the original username argument in the view function, where the
"EditProfileForm" object
is created.
More Database Relationships
This chapter is going to really complicate what you learned in Chapter 4
about database relationships.
For every user, we want to maintain a list of "followed" and "follower" users for each user.
Unfortunately, a
relational database doesn't have a list type that we can use for these lists, all there is are
tables with
records and relationships between said records.
The database we've implemented already has a table that represents users, so what's left is to come
up with the
proper relationship type that can model the follower/followed link.
Alright, before going into what's next for the database, I'm just going to go over every basic
database relationship
type to stay organized.
One-To-Many
Well, we've already covered this one in Chapter 4, right here
Many-To-Many
This relationship is a bit more complex. For example, let's consider a database that has "students"
and "teachers".
We can say that a student has 'many' teachers, and a teacher has 'many' students. As Miguel Grinberg
describes it,
it's like two overlapped one-to-many relationships from both ends.
For this kind of relationship, we should be able to query the database and obtain the list of
teachers that teach a
given student, and the list of students in a teacher's class. This is actually difficult to
represent in a relational database,
as it can't be done by adding foreign keys to the existing tables.
A reason why a many-to-many relationship can't be defined using two tables alone is because we can't
have more
than one teacher_id column for the student's multiple teachers.
It's just not the way databases work, and I'll show you why.
 (3).jpg)
This kind of relationship doesn't work in this manner, since we can't have multiple columns for the
"teacher_id"s.
The teacher_id column can only hold one value, so separating with commas like I did in that diagram
also doesn't work.
Finally, we can't add another row, since it would be duplication of the students.
All of these things would break the rules of normalization. It's for all these reasons that we have a
joining/association/junction/bridging table.
Here is how the database would look for the students and teachers example with an auxiliary
association table:
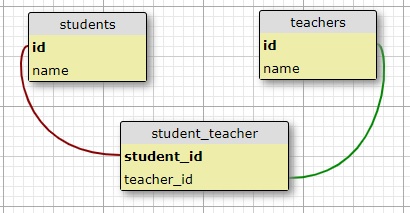
Instead of going straight into the teachers table, there's a foreign key with the teacher's id
established
inside of the association table, that's then used to connect with the students table. This is how it
becomes similar
to a one-to-many relationship. Now, the association table with its two foreign keys is able to
efficiently answer
all the queries about the relationship.
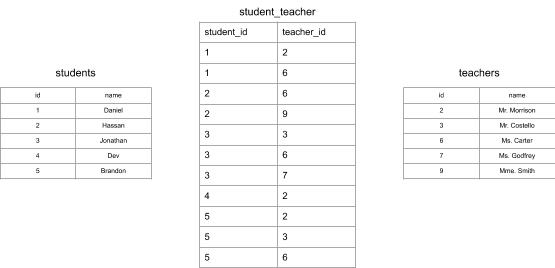
Here's a full example of what this association table diagram would look like with the same instances
from before:
Many-To-One
This is essentially the same thing as a one-to-many relationship, only that you're looking at this
relationship from the
'many' side. In other words, the local table is the one with 'many' now, and the other table has
'one'.
Both tables have a primary key, like the one-to-many relationship. The foreign key goes on the 'many'
side of the relationship.
The foreign key points to a primary key in a table on the 'one' side of the relationship.
One-To-One
This is actually a special case of a one-to-many relationship. The representation is similar, but a
constraint is
added to the database to prevent the 'many' side to have more than one link. It's not a very common
type of relationship,
but it may come up some day for you.
Representing Followers
Alright, now that we've established and hopefully understood the basic data relationships there are,
let's get back to
our application. For microblog, we're going to need a "many-to-many" relationship to track
followers, because a user
follows 'many' users, and a user has 'many' followers. However, since users are just following each
other, and not another
table like in the student_teacher example, we need to do it slightly differently.
The second entity of the relationship (instead of teachers being the second entity for students) is
also the users. A relationship
in which instances of a class are linked to other instances of the same class is called a
self-referential relationship.
Here's a diagram of the self-referential "many-to-many" relationship that keeps track of followers:
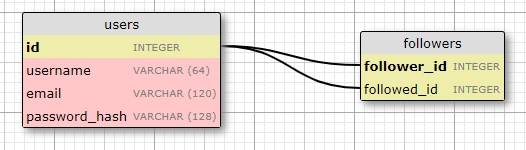
In this case the "followers" table is the association table of the relationship. The foreign keys in
this table
are both pointing at entries in the user table, since it's linking users to users. Each record in
this table
represents one line between a follower user and a followed user. Like the students and teachers
example, a setup
like this one allows the database to answer all queries about followed and follower users that we'll
need.
Adding Followers Table
Now, we need to add the "followers" association table to the database in the "models.py" file.
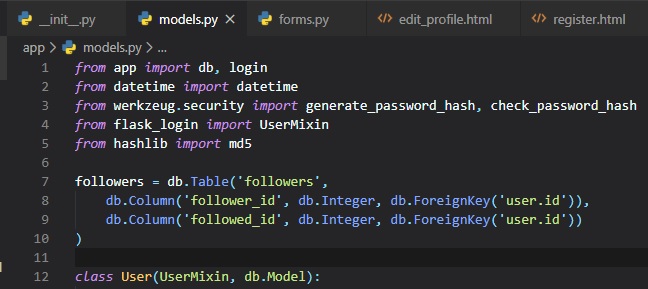
This is just translating the followers association table diagram into code.
Note that we're not declaring this table as a model, like we did for the users and posts tables.
Since, this is an
auxiliary table that has no data other than the foreign keys, we created it without an associated
model class.
Now, we can declare the "many-to-many" relationship in the users table in the "models.py" file.
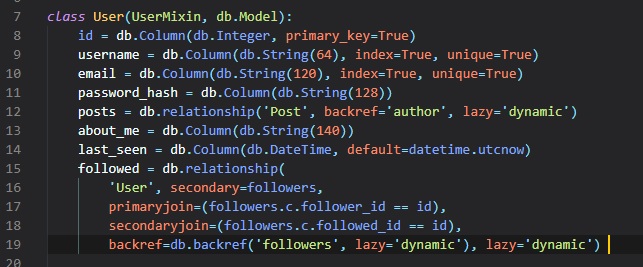
Here, we're just using the "db.relationship()" function to define the relationship in the "User"
model class, just
like we did for the posts "one-to-many" relationship. This relationship links "User" instances to
other "User"
instances. Let's just say that for a pair of users linked by this relationship, the left side user
is following
the right side user. We're defining this relationship as seen from the left side user with the name
"followed",
because when we query this relationship from the left side we'll get the list of followed
users (those on the right
side).
Let's just go over all arguments to the "db.relationship()" call one at a time:
- "User" is the right side entity of the relationship (the left side entity is the parent class).
Since this is a
self-referential relationship, we have to use the same class on both sides.
- "secondary" configures the association table that's used for this relationship, which we defined
right above this class.
- "primaryjoin" indicates the condition that links the left side entity (the follower user) with
the association
table. The join condition for the left side of the relationship is the user ID matching the
"follower_id" field of the
association table. The "followers.c.follower_id" expression references the "follower_id" column
of the association table.
- "secondaryjoin" indicates the condition that links the right side entity (the followed user)
with
the association table.
This condition is similar to the one for "primaryjoin", with the only difference being that
we're now using "followed_id", which
is the other foreign key in the association table.
- "backref" defines how this relationship will be accessed from the right side entity. From the
left side, the
relationship is named "followed", so from the right side we're going to use the name "followers"
to represent all
the left side users that are linked to the target user in the right side. The additional "lazy"
argument indicates the
execution mode for this query. A mode of "dynamic" sets up the query to not run until
specifically requested, which
is also how we set up the posts one-to-many relationship.
- "lazy" is similar to the paramter of the same name in the "backref", but this one applies to the
left side query
instead of the right side.
These new changes to the database need to be recorded in a new database migration.
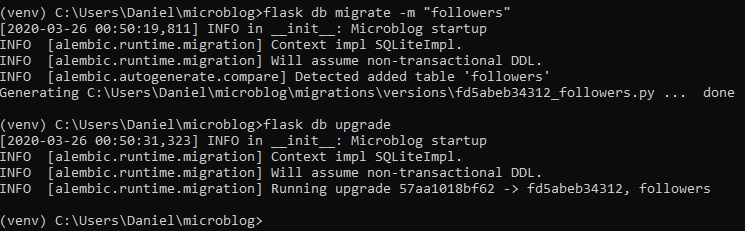
Adding & Removing 'Follows'
Thanks to the SQLAlchemy ORM, a user following another user can be recorded in the database working
with the
"followed" relationship as if it was a list. This is done just by appending the followed users to a
list and removing
them to 'unfollow'.
Even though this method of adding and and removing followers is fairly easy, we want to promote
reusability in our code,
so we're not going to put a bunch of 'appends' and 'removes' though the code. Instead, we're going
to implement the "follow"
and "un follow" functionality as methods in the "User" class inside the "models.py" file (or, the
"User" model). It's always
best to move the application logic away form view functions and into models or other auxiliary
classes or modules, because
it makes unit testing much easier, as you'll see later in this chapter.
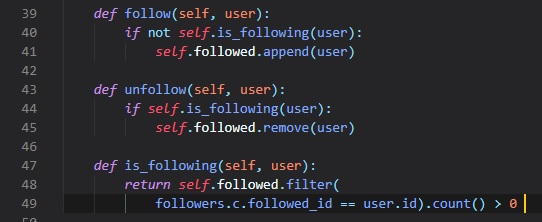
The "follow()" and "unfollow()" methods justuse the "append()" and "remove()" methods of the
relationship object as
explained above, but beofre they affect the relationship, they use the "is_following()" supporting
method to make sure
the requested action makes sense, meaning they're not already following this user to 'follow' them,
or are already following
the user to 'unfollow' them.
The "is_following()" method issues a query on the "followed" relationship to check if a link between
two users already exists.
We're used the "filter_by()" method of the SQLAlchemy query object before, from when we found a user
given its username.
The "filter()" method that we're using here is similar, but can include arbitrary filtering
conditions, unlike "filter_by()"
which can only check for equality to a constant value. The condition that we're using in the
"is_following()" method looks for
items in the association table that have the left side foreign key set to the "self" user, and the
right side set to the "user" argument.
the query is terminated with a "count()" method, which returns the number of results (which will
either
be 0 or 1). Other query
terminators we've used in the past have been "all()" and "first()".
Getting Posts From Followed Users
In the index page of the application, we want to show blog posts written by all the people that are
followed by the
logged in user, much like you'd see on Instagram. To do this, we need to come up with a database
query that returns
these posts.
An obvious way to do this is to obtain all followed users by "user.followed.all()" and then iterating
through each user
to display their posts. Then, we could merge these posts into a single list and sort them by date.
However, this approach has a few of problems:
- Executing an infinitely large amount of database queries depending on how many users the logged
in user's following
would take a while.
- We'd need to merge and sort these infinite number of posts in memory.
- Consider that the home page will eventually have 'pagination' implemented, so it won't display
all the available posts,
but just the first few, with a link to get more if desired (like Instagram)
There's actually no way to avoid this merging and sorting of blog posts, but doing it in the
application itself results
in a very inefficient process. This kind of work is what relational databases excel at, and can help
us with. The database
has indexes that allow it to perform the queries and the sorting in a much more efficient way. So,
what we really want
is to come up with a single database query that defines the information that we want to get, and
then let the database
figure out how to extract that information in the most efficient way on its own. Let's go ahead and
write this query under
a new method in the "User" model.

Okay, since this is a fairly complex query, I'll go through it one method of the SQLAlehcmy query
object at a time.
Join()
Let's look at an example of what the join operation does. Let's assume that we have a "User" table
with the following contents:
.jpg)
For this example, we'll only be looking at these two fields of the user, since they're the only ones
that matter right now.
However, if there were to be more fields to add, you'd just add more columns to each user.
This is what the association table would then look like for this example, rather than the
"student_teacher" many-to-many relationship.
.jpg)
This just shows practical examples of who's following who modeled in another diagram.
Finally, the posts table would contain one post from each user.
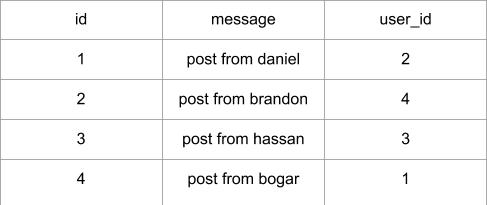
This table leaves out some fields, though. These being, who's the 'follower' user and who's the
'followed' user, which we can
obtain by using the "join()" method of the SQLAlchemy query object.
Once again, here's the join() call that was defined for this query:

This is why we are invoking the join operatin gon the posts table. The first argument is the
followers association table,
and the second argument is the join condition. What we're saying with this call is that we want the
database to create a
temporary table that combines data form posts and followers tables. This data will be merged
according to the condition.
The condition that we used states that the "followed_id" field of the followers table must be equal
to the "user_id" of the
posts table. To perform this merge, the database will take each record from the posts table (left
side of the join) and append
any records from the "followers" table (the right side of the join) that match the condition. If
multiple records in "followers"
match the condition, then the post entry will be repeated for each. If for a given post there's no
match in 'followers', then
that post record is not part of the join.
Now, the result of the join operation with the example data defined above will result in a table that
looks like this:
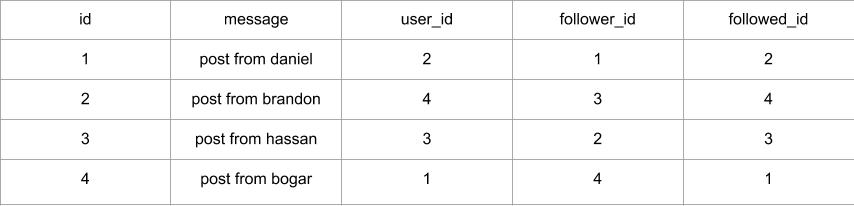
If these values seem complicated to you, just backtrack and look at the previous followers and posts
tables to see
how they merged together. If the values in the followers table don't make sense to you, just look
back at the
original users table with just the ids and usernames.
Note that the "user_id" and "followed_id" columns are always equal, as this was the result of the
join condition being True.
Filter()
The join operation gave us a list of all the posts that are followed by some user, which is a lot
more data than what's
needed for one specific user. We're only really interested in the posts from followed users as it
pertains to the logged in
user. Since, we're only interested in a subset of this list, the posts followed by a single user, we
need to trim all the
entries that aren't needed, which can be done with a "filter()" call.
Once again, here's the filter() call that was defined for this query:

Since, this query is in a method of class "User", the "self.id" expression refers to the user ID of
the user that's
currently logged in. The "filter()" call selects the items in the joined table that have the
"follower_id" column set to
this user, which in other words means that we're keeping only the entries that have this user as a
follower (or, are followed by this user).
Let's say the user that's logged in is "bogar", who's "user_id" field is set to 1. Here,s how the
joined table would look
after applying the filtering method:

Remember that the query was issued on the "Post" class, so even though we ended up with a temporary
table that was
created by the database as part of this query, the result will be the posts that are included in
this temporary table,
without the extra 'followers' columns added by the join operation.
Order_by()
The last step of this giant query is to sort the results of it. Once again, here's the order_by()
call that was defined for this query:

Here, we're just saying that we want the results sorted by the timestamp field of the post in
descending order. With this order,
the first result will be the most recent blog post.
Combining Own & Followed Posts
Although, the query we've setup to retrieve all posts from followed users is great, we also need to
add one more thing
to the index page of our web application. People expect to see their own posts included in their
timeline of followed users,
and the query itself doesn't have that capability.
There's two possible ways of expanding this query to include the user's own posts:
- The mose straightforward way is to leave the query as it is, but make sure all users are
following themselves. If you're
your own follower, then the query as shown above will find your own posts along with those of
all the people you follow.
Though, this solution isn't optimal, since it'll affect the stats you have regarding followers.
Although, the inflation
would only be +1, so you could constantly subtract the follower and followed numbers by 1.
The second way to do this is by creating a second query that returns the user's own posts, and
then uses the "union"
operator to combine the two queries into a single one.
We're going to go with the second approach. Below you can see the "followed_post()" function after
it's been
expanded to include the user's posts through a union:
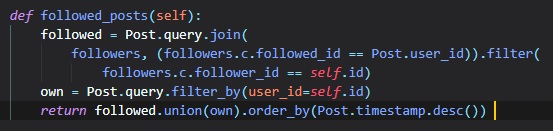
Note that the "followed" and "own" queries are combined into one before order_by is called.
Unit Testing
To make sure that this code will continue to work in the future, as we make modifications on
different parts of the application, is to
write and execute unit tests. These are included with Python in a useful "unittest" package. Let's go
ahead and write
some unit tests for the existing methods in the "User" class in a "tests.py" file at the top-level
of the application's files.
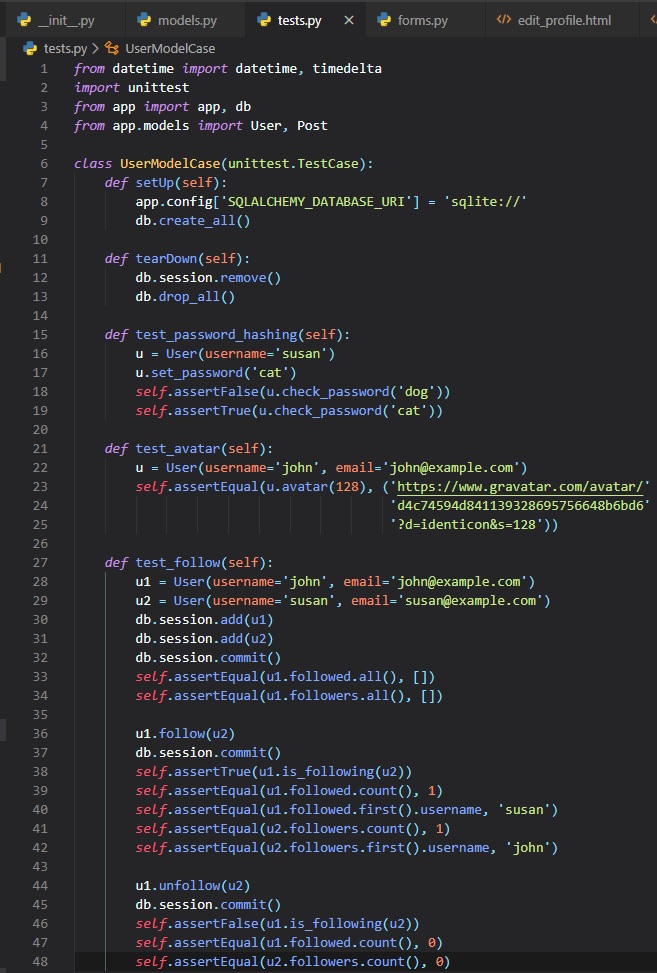
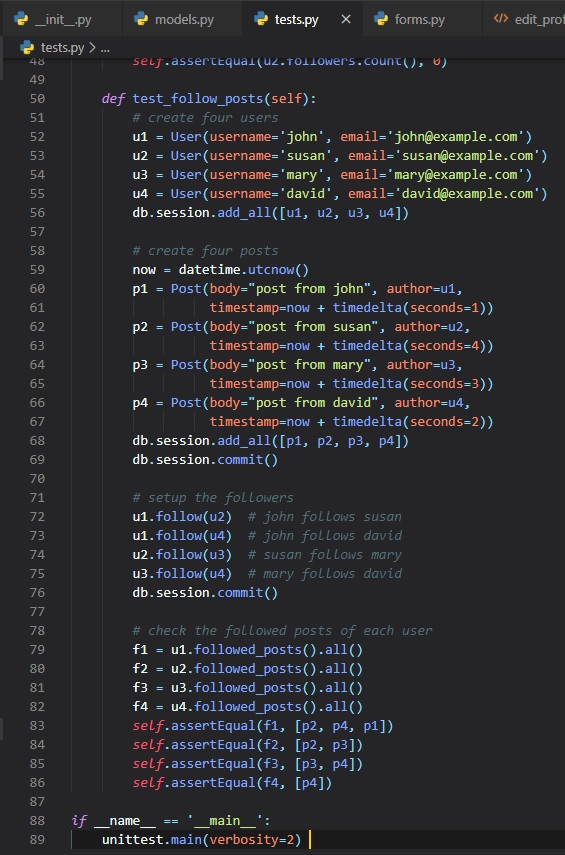
I know it's a lot of code just for some tests, but here we've added four tests that exercise the
password hashing,
user avatar and followers functinality in the "User" model. The "setUp()" and "tearDown()" methods
are special methods
that the unit testing framework execute before and after each test...much like when Mr. Morrison
says to tear down and
get set up.
We've implemented a little feature in "setUp()" to prevent the unit tests from using the regular
database that we use for development.
by changing the application configuration to "sqlite://" we get SQLAlchemy to use an in-memory
SQLite database during the tests.
The "db.create_all()" call creates all the database tables. This is a quick way to create a database
from scratch
that's useful for testing. For development nad production use we've already seen how to create
database migrations.
Now that the tests are set up, we can run this file using the "python" command in the terminal like
so:
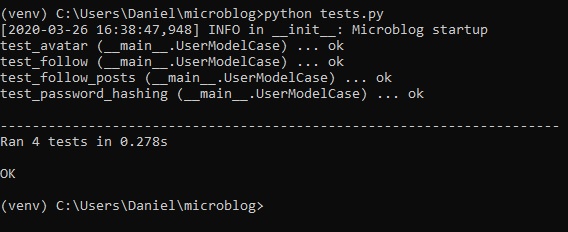
Integrating Followers
After all that database stuff, we can finally actually implement this new system for followers into
our web application.
Though, there aren't any new concepts here for you to understand. We just need to add two new routes
in the application
to follow and unfollow a user in the "routes.py" file.
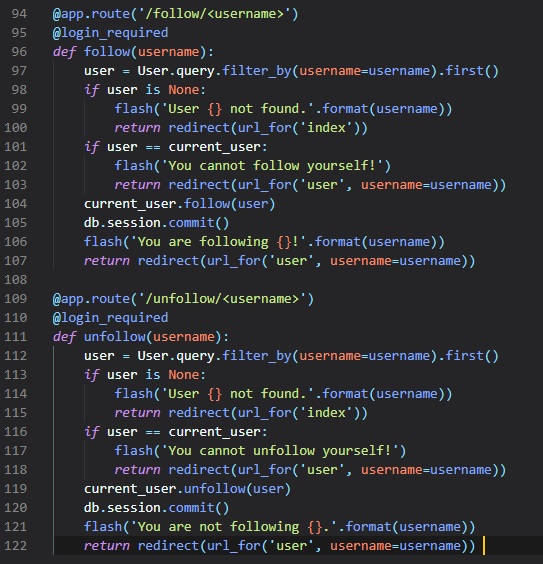
These should be self-explanatory, but take notice to all the error checking that we're doing to
prevent unexpected
issues and try to provide a useful message to the user when a problem has occured.
With these new view function (or routes) in place, we can link to them form pages in the application.
we're going to
add links to follow and unfollow a user in the profile page of each user.
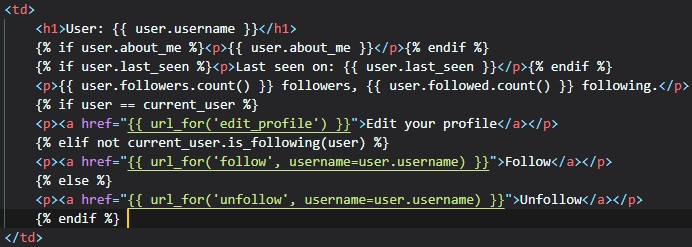
This now adds a line below the last seen timestamp that shows how many followers and followed users
this user has.
The other line that has the "Edit" link when you are viewing your own profile can now have one of
three possible links:
- If the user is viewing their own profile, the "Edit" link shows as before.
- If the user is viewing a user that's not currently followed, the "Follow" link shows.
- If the user is viewing a user that's currently followed, the "Unfollow" link shows.
Blog Post Submission
Let's start with a form in which users can type new posts. First we create a form class in the
"forms.py" file.

Next, we need a new form on the home page of the application in which users can type new posts in the
"index.html" file.
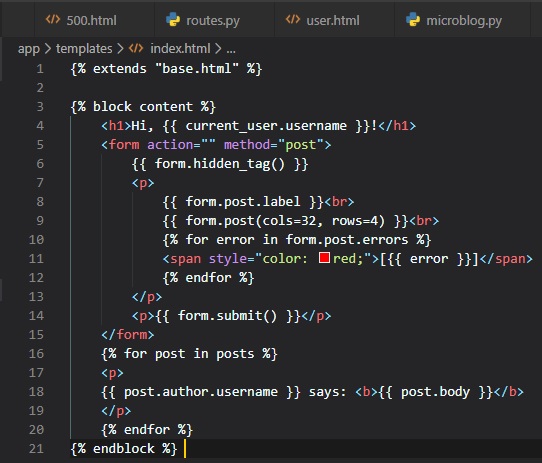
Now, we need to add the form creation and handling in the view function in the "routes.py" file.
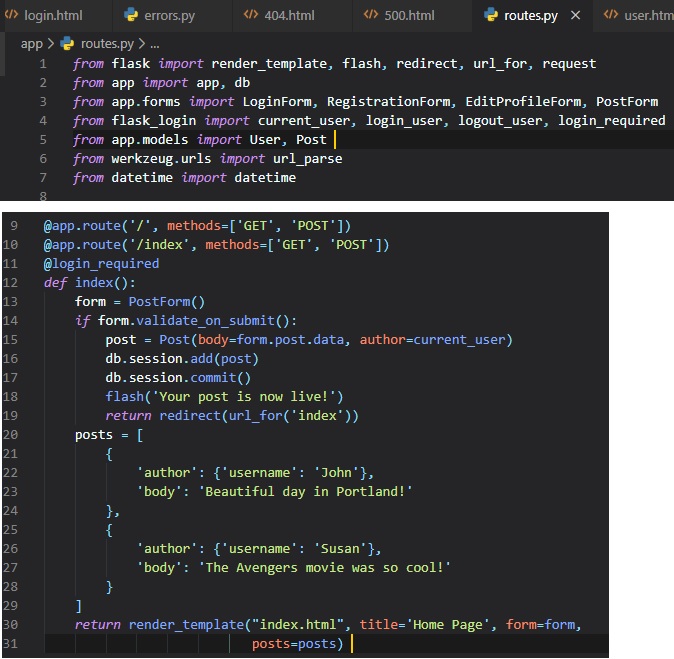
These are all the changes made in this view function:
- We're now importing the "Post" and "PostForm" classes.
- We accept "POST" requests in both routes associated with the "index" view function in addition
to "GET" requests,
since this view function will now receive form data.
- The form processing logic inserts a new "Post" record into the database.
- The template receives the "form" object as an additional argument, so that it can render the
text field.
You may be wondering why there's a redirect back to the same page that the user's already going to be
on. Well, this
is done to mitigate an annoyance with how the refresh command is implemented in web browsers. All
the web browser does
when you hit the refresh key is to re-issue the last request. If a "POST" request with a form
submission returns a regular
response, then a refresh will re-submit the form. Since, this is unexpected, the browser is going to
ask the user to confirm
the duplicate submission, but most users will not understand what the browser is asking from them.
However, if a "POST" request
is answered with a redirect like the one we have, the browser is now instructed to send a "GET"
request to grav the page
indicated in the redirect, making our application work in a more predictable way.
This simple trick is called the Post/Redirect/Get pattern.
Removing Fake Blog Posts
We can now replace our two fake blog posts in the "index" view function with real ones.
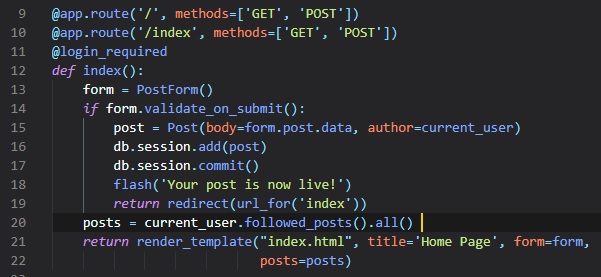
Explore Page
We're now going to make a page that'll address the issue of not being able to find other
users (without manually typing
in their profile URLs). Here's the new explore view function:

We're actually reusing the "index" template in rendering this one's template, since they'll be so
similar. Hence, why we
added 'index.html' into the arguments of the "render_template()" function. One difference with the
main page is that in the
explore page, we don't want to have a form to write blog posts, so in this view function we didn't
include the "form"
argument in the template call.
To prevent the "index.html" template from crashing when it tries to render a web form that doesn't
exist, we're going to add
a conditional that only renders the form if it's defined.
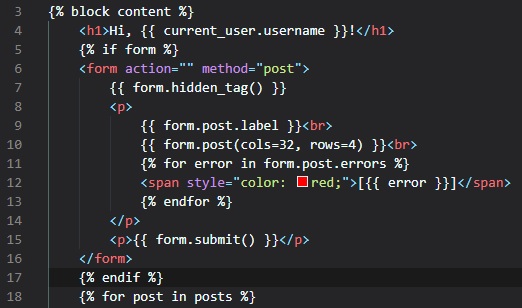
We're also going to add a link to this new page in the navigation bar in the "base.html" file.
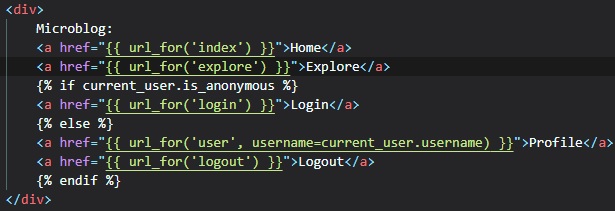
We're going to go back to the "post.html" sub-template from earlier. This was a small template that
was included form the
user profile page template, and was separate so that it can also be used from other templates. We're
now going to make a
small improvement to it, which is to show the username of the blog post author as a link.
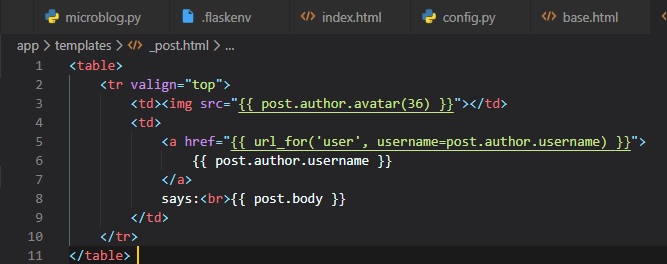
We can now use this sub-template to render blog posts in the home and explore pages.
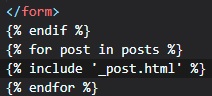
This is now what the explore page is looking like after adding a few posts from different registered
users:
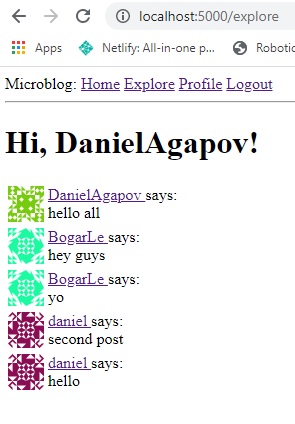
Blog Post Pagination
Now, it's time to implement pagination, which will limit the amount of posts per page at one time, to
avoid clutter,
run time being too long, and other issues that could arise with having all of them displayed at
once.
In paginating the post list, we're going to show just a limited number of posts at a time, and
include links to
navigate through the entire list of posts. Flask-SQLAlchemy supports pagination natively with the
"paginate()" query method.
The "paginate()" method can be called on any query object form Flask-SQLAlchemy. It takes these three
arguments:
- The page number, starting from 1.
- The number of items per page.
- An error flag. If True, when an out of range page is requested a 404 error will be automatically
returned to the
client. If False, an empty list will be returned for out of range pages.
The return value from "paginate()" is a Pagination object. The "items" attribute of this object
contains
the list of items in the requested page.
Now, let's start by adding a configuration item to the application that determines how many items
will be displayed per page.
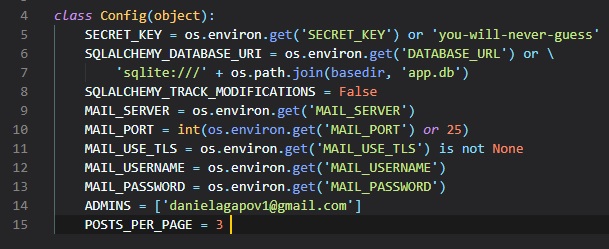
This single adjustment to the Config class will be applied throughout the entire web application.
Next, we need to use a query string argument to specify an optional page number, defaulting to page 1
if it's not given.
Here are some example URLs that show how we're going to implement this:
- Page 1, implicit: http://localhost:5000/index
- Page 1, explicit: http://localhost:5000/index?page=1
- Page 3: http://localhost:5000/index?page=3
In order to access arguments given in the query string, we can use the Flask's "request.args"
object. We've
seen this already in Chapter 5, where we implemented user login URLs
from Flask-Login
that can include a "next" query string argument.
Below, you can see how we're adding pagination to the home and explore view functions:
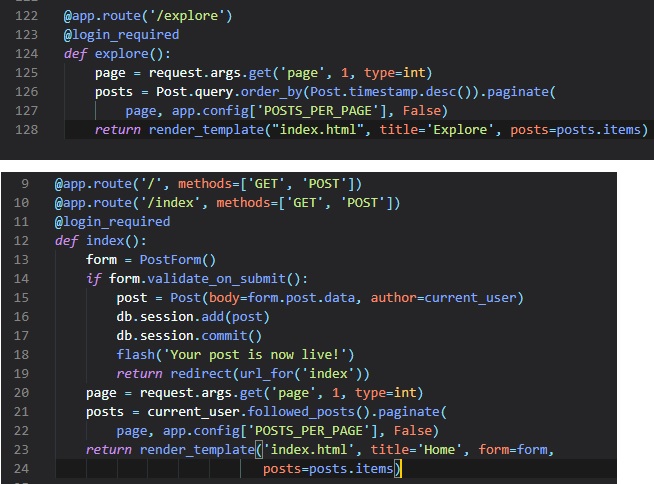
Make sure you have at least 3 blog posts, then go ahead and try this out in your browser's
address bar like so:
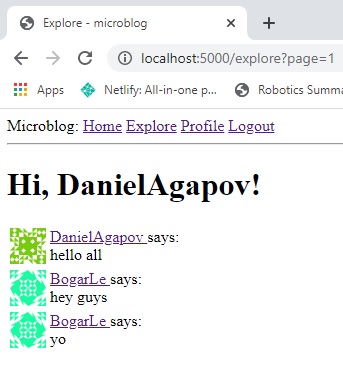
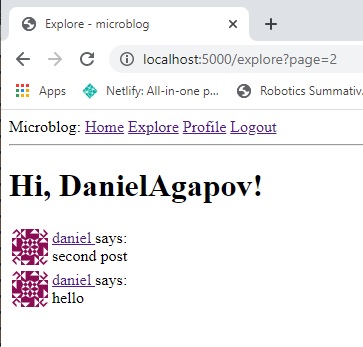
Page Navigation
The next change we need to implement is to add links at the bottom of the blog post list that
allow
users to navigate to the next and/or previous pages.
Earlier you learned that the return value from a "paginate()" call is an object of a Pagination
class form Flask-SQLAlchemy,
and that one of its attributes was "items". Now, we're going to use another 4 of its attributes:
- "has_next": True if there's at least one more page after the current one
- "has_prev": True if there's at least one more page before the current one
- "next_num": The page number for the next page
- "prev_num": The page number for the previous page
With these four attributes, we can generate next and previous page links and pass them down to
the templates for rendering in the "routes.py" file.
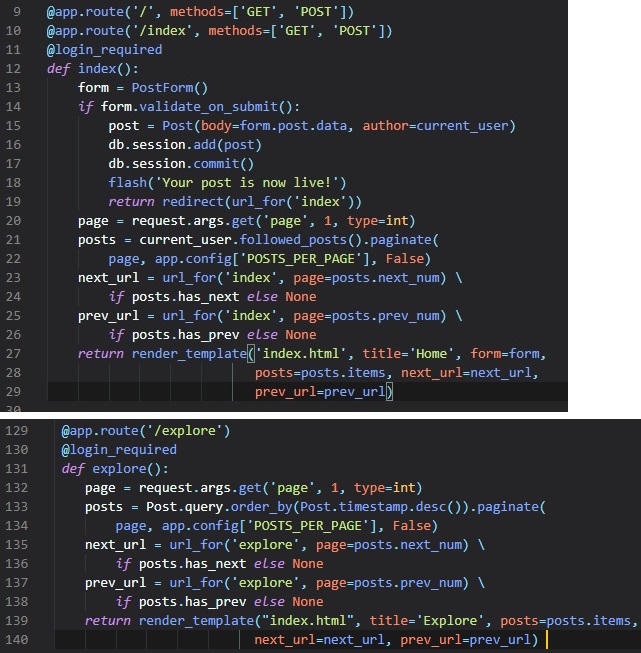
The "next_url" and "prev_url" in these two view functions are going to be set to a URL reutrned
by "url_for()" only
if there's a page in that direction. If the current page is at one of the ends of the collection
of posts (beginning or end),
then the "has_next" or "has_prev" attributes of the Pagination object will be False, and in that
case the link in that
direction will be set to None.
The pagination links are being set to the "index.html" template, so now let's render them on the
page, right below the post list:
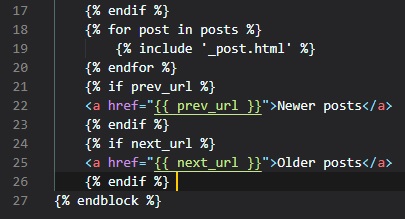
Here are the changes we've just made to the application in action:
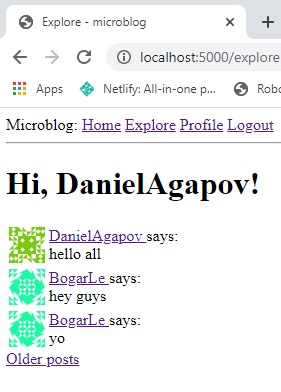
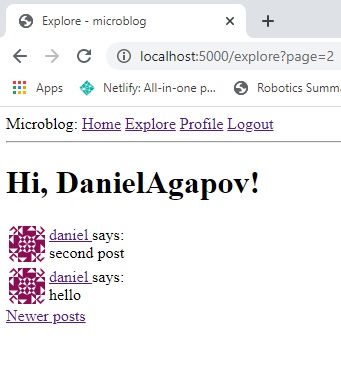
Profile Page Pagination
There's also a list of posts in the user profile page, which shows only posts from the owner of
the profile. To be consistent,
the user profile page should also be changed to match the pagination style of the "index" page.
We begin by updating the user profile
view function, which still has a list of fake post object in it.
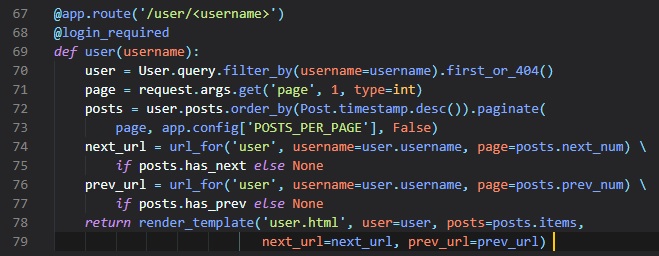
To get the lists of posts from the user, we take advantage of the fact that the "user.posts"
relationship is a query that's
already set up by SQLAlchemy as a result of the "db.relationship" definition in the "User"
model. We take this query and add
an "order_by()" clause so that we get the newest pages first, and then do the pagination exactly
like we did for the posts in
the index and explore pages. Note that the pagination links that are generated by the
"url_for()" function need the extra "username"
argument, becuase they're pointing back at the user profile page, which has the username as a
dynamic component of the URL.
Finally, the changes to the "user.html" template are identical to those we made on the "index"
page.
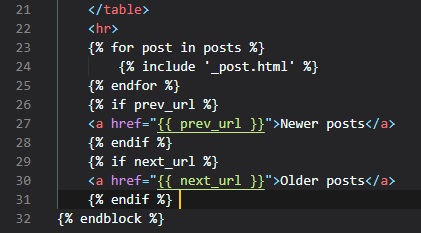
Now, as an optional addition, you can set the POSTS_PER_PAGE value to something different in the
"config.py" file if you'd like.

Introduction To Flask-Mail
Let's start off by installing a couple extensions from Flask and Python. The first is called
"flask-mail"

The second is called "pyjwt". This will help to generate secure tokens for the password reset links.

The configuration variables we set earlier in the "config.py" file will work with Flask-Mail.
Like the other Flask extensions we've installed, we need to create an instance right after the Flask
application is created
in the "__init__.py" file. In this case this it's an object of class "Mail".
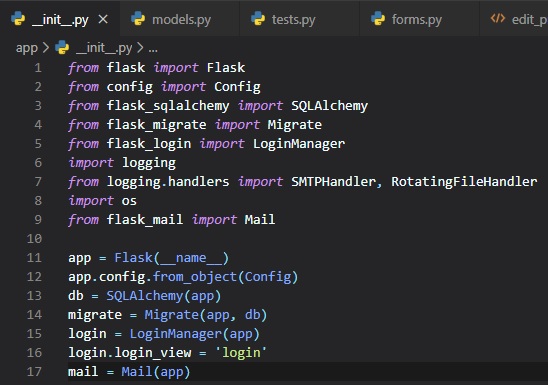
Since we're planning to test sending of emails we have the same two options mentioned in Chapter 7.
We're going to go with the second one, which means actually sending an email to ourselves. This
requires setting these environment
variables like so (use "export" instead of "set" if you're not on Microsoft Windows):
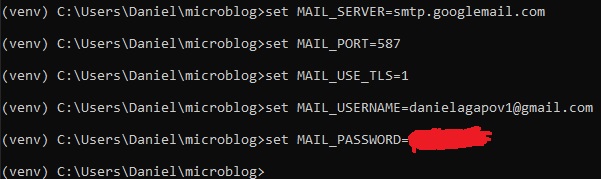
Once again, don't worry if you don't get an email, though. Since, your Gmail account may prevent the
application from
sending emails through it unless you explicitly allow "less secure apps" access to your Gmail
account. You should
get an email saying that there's a "Google Security Alert", which leads you to information on how to
allow this option.
Flask-Mail Usage
To learn how Flask-Mail works, you'll see how to send an email from a Python shell. After typing in
the "flask shell" command
into your terminal, run the following commands:
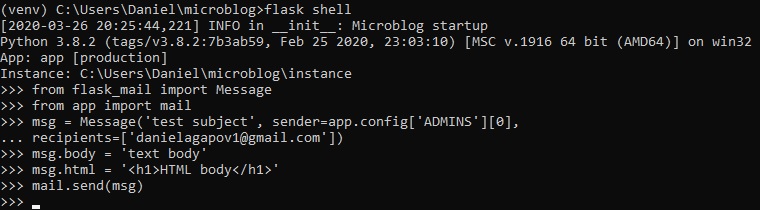
Now, just check your inbox and you'll have the email sent to you and any other email addresses you
included in the "recipients" argument.
We put the sender as the first configured admin. The email will have plain text and HTML versions, so
depending on how your email client
is configured you may see one or the other. For Gmail, I believe it's the HTML version.
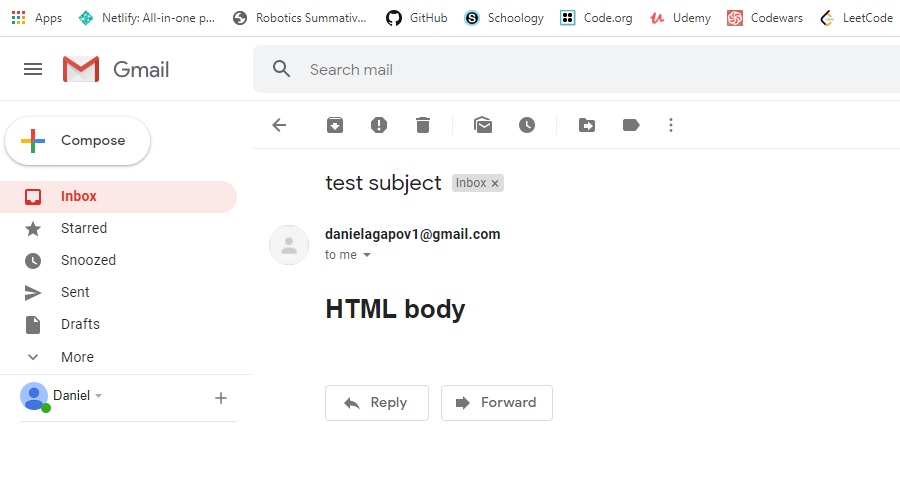
Simple Email Framework
Now, let's integrate emails directly into our application.
We'll begin by writing a helper function that sends an email in a new file/module called "email.py"
inside of the "app" folder.
This is the same thing as what we saw in the previous section in the python shell.
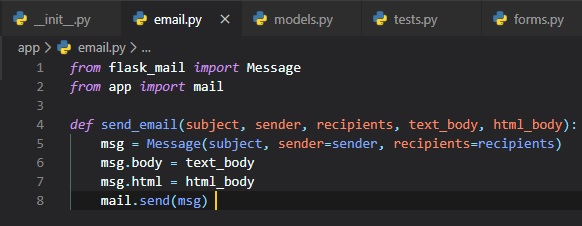
Password Reset Request
For the purpose of allowing users to have the option to request their password to be reset, we're
going to add a link in the login page.

When the user clicks the link, a new web form will appear that requests the user's email address as a
way to initiate the password
reset process. This will be created in the "forms.py" file as a new form class.

Now, we need to also create a new corresponding HTML template called "reset_password_request.html".

We also need a view function to handle this form in the "routes.py" file.
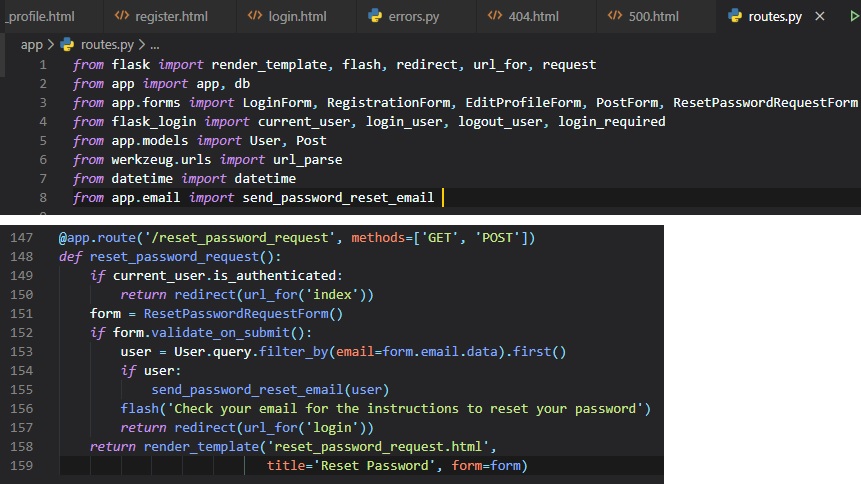
This view function is fairly similar to others that process a form. We start it off by making sure
the user isn't logged in. If they
are, then there's no point in using the password reset functionality, so we simply redirect them to
the "index" page.
When the form is submitted and valid, we look up the user by the email provided by the user in the
form. If we find the user,
we send a password reset email, which'll be done using a "send_password_reset_email" function that
we'll make later.
After the email's sent, we flash a message directing the user to look for the email for further
instructions, and then redirect them
back to the login page. We are actually displaying the flashed message even if the email provided by
the user is unknown. This is so
that clients can't use this form to figure out if a given user is a member or not.
Password Reset Tokens
Before we implement the "send_password_reset_email" function, we need to have a way to generate a
password request link. This is going
to be the link that's sent to the user via email. When the link's clicked, a page where a new
password can be set is presented to the
user.
The links are going to be supplied with a token, and this token will be validated before allowing the
password change, as proof that
the user that requested the email has access to the email address on the account. A very popular
token standard for this type of
process if the JSON Web Token, or JWT. These tokens are self contained, which means you can send a
token to a user in an email, and
when the user clicks the link that feeds the token back into the application, it can be verified on
its own.
We're going to launch a Python shell session to understand them by just typing in "python" or
"python3" into the terminal.
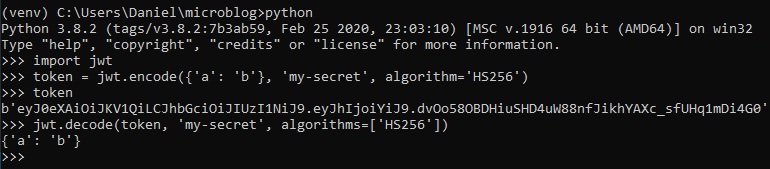
The {'a': 'b'} dictionary is an example payload that's going to be written into the token. To make
the token more secure, a secret
key needs to be provided to be used in creating a cryptographic signature. For this example, we've
used the string 'my-secret', but
with the appliation we're going to use the "SECRET_KEY" from the "config.py" file. The "algorithm"
argument specifies how the
token is to be generated, HS256 being the most widely used one.
The resulting token is a long sequence of characters. However, it's not an encrypted token. The
contents of the token, including the paylod,
can be decoded easily by anyone. What makes the token secure is that the payload is signed. If
somebody tried to forge or tamper with the
payload in a token, then the signature would be validated, and to generate a new signature the
secret key is needed. When a token is
verified, the contents of the payload are decoded and returned back to the caller. If the token's
signature was validated, then the payload
can be trusted as authentic.
The payload that we're going to use for the password reset tokens is going to have the format
{'reset_password': user_id, 'exp': token_expiration}.
the "exp" field is standard for JWTs, and if present, it indicates an expiration time for the token.
If a token has a valid signatiure,
but it's past its expiration timestamp, then it'll also be considered invalid. For the password
reset feature, we'll give these tokens 10 minutes till their expiration.
When the user clicks on the emailed link, the token's going to be sent back to the application as
part of the URL, and the first
thing the view function that handles this URL will do is verify it. If the signature is valid, then
the user can be identified by the ID
stored in the payload. Once the user's identity is known, the application can ask for a new password
and set it on the user's account.
Since, these tokens belong to users, we're going to write the token generation and verification
functions as methods in the "User" model in the "models.py" file.
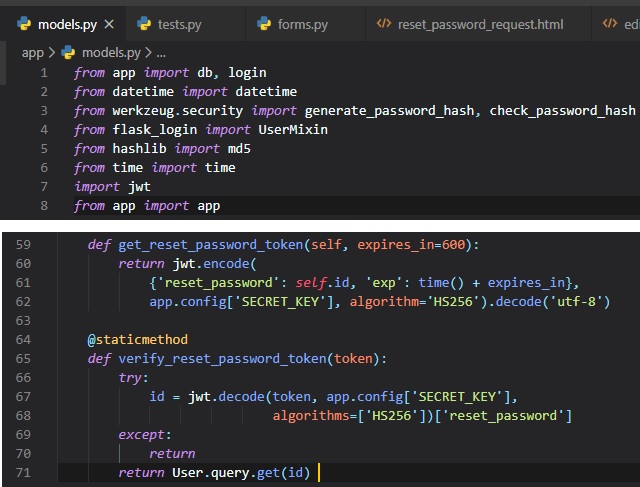
The "get_reset_password_token()" function generates a JWT token as a string. Note that the
"decode ('utf-8')" is necessary becuase the
"jwt.encode()" function returns the token as a byte sequence, but in the application it's more
convenient to have the token as a string.
The "verify_reset_password_token()" is a static method, which means that it can be invoked directly
from the class. A static method is
similar to a class method, with the only difference being that static methods don't receive the
class as a first argument. This method takes
a token and attempts to decode it by invoking PyJWT's "jwt.decode()" function. If the token can't be
validated or is expired, an
exception will be raised, and in that case we'll catch it to prevent the error, and then return None
to the caller of the function. If the
token is valid, then the value of the "reset_password" key from the token's payload is the ID of the
user, so we can load the user and return it.
Password Reset Email
Now, that we have the tokens, we can generate the password reset emails. The
"send_password_reset_email()" function relies on the "send_email()"
function written earlier. Here's the new function in the "email.py" file:
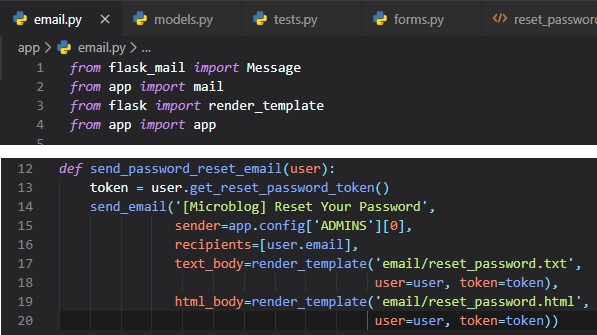
Now, we just have to make the two files that the render_template() function renders from. One for
.txt format and one in .html format.
Since, we take the user and token as arguments, there can be a personalized email message generated
by these files. These two
files are going to be made inside the "email" folder inside the "templates" folder and are both
going to be called "reset_password", just
with two different file extensions: .txt and .html.
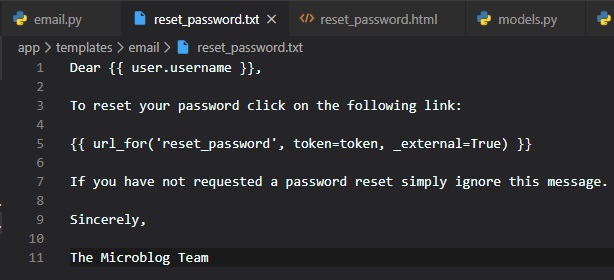
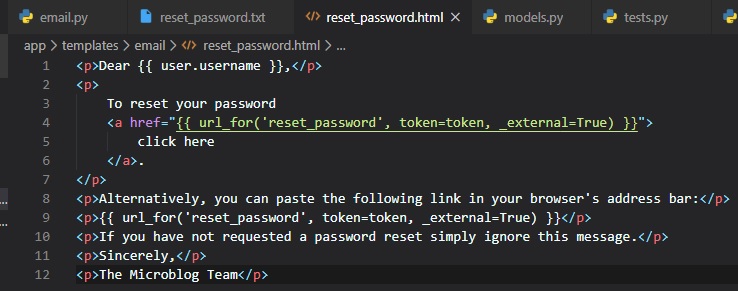
The "reset_password" route that's referenced in the "url_for()" call in these two email templates
doesn't exist yet, but will be added later.
The "_external=True" argument that's included in the "url_for()" calls in both templates is also
new. The URLs that are generated by
"url_for" by default are relative URLs, which have been explained in Chapter
5. When "_external=True" is passed
as an argument, complete URLs are generated.
User Password Resetting
When the user clicks on the email link, we want for there to be a second route associated with this
feature. We're going to make the
password request view function in the "routes.py" file.
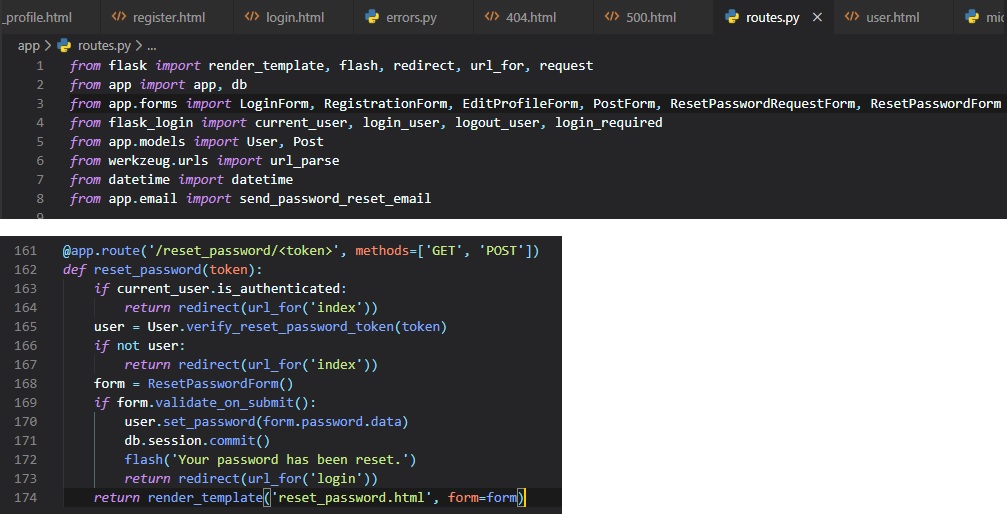
In this view function, we first make sure the user isn't logged in, and then we determine who the
user is by invoking the token verification
method in the "User" class. This method returns the user if the token is valid, or None if not. If
the token is invalid we redirect them to the home page.
If the token is valid, then we present the user with a second form, in which the new password is
requested. This form is processed in a way
similar to previous forms, and as a refult of a valid form submission, we invoke the "set_password"
method of "User" to change the password,
and then redirect them to the login page, where the user can now login.
Here's the new ResetPasswordForm class in the "forms.py" file:

Here's the corresopnding HTML template file named "rest_password" in the "templates" folder:

You can now go ahead and try out the new password reset feature if you'd like
Asynchronous Emails
Sending an email slows the application down considerably. All the interactions that need to happen
when sending an email make the
task slow, since all these things can take some time:
- Getting the email out.
- Waiting for the possibly slow email server of the recipient.
- Sending the email to multiple addresses.
What we really want here is for the "send_email()" function to be asynchronous. This means that when
this function is called,
the task of sending the email is schedule to happen in the background, freeing the "send_email()" to
return immediately so that the
application can continue running concurrently with the email being sent. Basically, the
application's code still keeps running while the
email gets sent.
Python has support for running asynchronous tasks, in multiple ways. The "threading" and
"multiprocessing" modules can both do this. Starting
a background thread for email being sent is much less resource intensive than starting a brand new
process, so that's the approach we're going with.
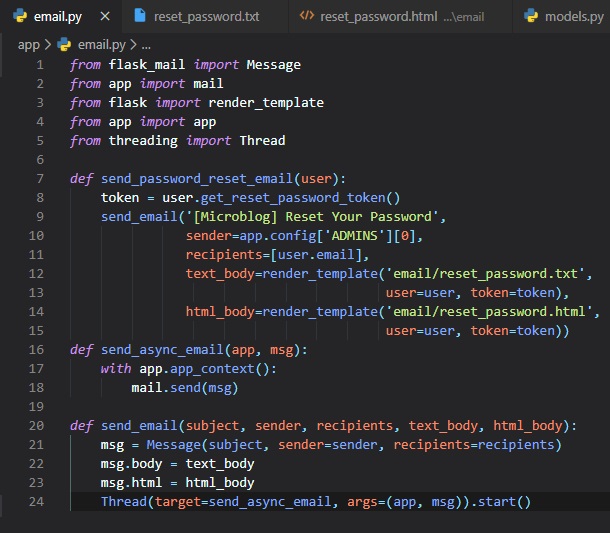
The "send_async_email" function now runs in a background thread, invoked via the "Thread()" class in
the last line of "send_mail()".
With this change, the sending of the email will run in the thread, and when the process completes,
the thread will end and clean itself up.
Along with the "msg" argument being sent to the thread, there's also the application instance. When
working with threads, Flask uses
contexts to avoid having to pass arguments across functions. There are two tpyes of contexts, the
application context and the request context.
In most cases, these contexts are automatically managed by the framework, but when the application
starts custom threads, contexts for
those threads may need to be manually created.
Many extensions require an application context to be in place to work, because that allows them to
find the Flask application instance
without it being passed as an argument. The reason many extensions need to know the application
instance is becuase they have their
configuration sotred in the "app.config" object, like what's the case with Flask-Mail. The
"mail_send()" method needs to access the configuration
variable values for the email server.
CSS Frameworks
If you just want to create decent looking web pages, but don't want to do it by yourself by writing
raw HTML and CSS code, then
the only practical solution is to use a CSS framework to simplify the task. You'll lose some of your
creative freedom by going
down this path, but your web pages will look good in all browsers without a lot of effort. A CSS
framework provides a collection
of high-level CSS classes with pre-made styles for common types of user interface elements.
Introducing Bootstrap
This is actually the CSS framework I personally used to help me design the website you're reading
this off of right now. Although, I did add an
extra ~100 lines of code in two CSS files I made.
Here are some of the benefits of using Bootstrap to style your web pages:
- There'll be a similar look in all major web browsers.
- It can handle desktop, tablet, and phone screen sizes (which is what makes this website mostly
cross-platform, aside from pictures).
- There are customizable layouts
- It has nicely styled navigation bars, forms, buttons, alerts, popups, etc.
The most direct way to use Bootstrap is to simply import the "bootstrap.min.css" file in your base
template. You can either download a copy of this file
and add it to your project, or import it directly from a CDN (Content Delivery Network). Then, you
can start using the general
purpose CSS classes it provides.
fortunately for us, there's a Flask extension called "Flask-Bootstrap" that provides a ready to use
base template that has the Bootstrap
framework already installed on it. To install it, type this command into your terminal window:

Using Flask-Bootstrap
Let's go ahead and initialize this extension in the "__init__.py" file.
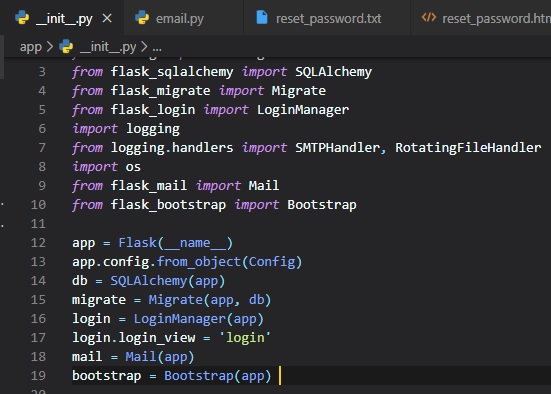
With the exntension initialized, a "base.html" templte becomes available in the "bootstrap" folder,
and can be referenced from
application templates with the "extends" clause.
However, we're already using the "extends" clause with our own "base.html" template. Our template
also deifned the navigation bar,
which included a few links, ans also exported a "content" block. All other templates in our
application inherit from the "base.html"
template and provide the "content" block with the main content of the page.
So, the idea of how we're going to fit the Bootstrap base template is to use a three-lvel hierarchy
instead of just two (being the base template
and the templates that inherit from it). The "base.html" template in the "bootstrap" folder provides
the basic structure of the page,
which includes the Bootstrap framework files. This template exports a few blocks for derived
templates such as "title", "navbar", and "content" blocks.
In turn, the bootstrap base template will export its own "app_content" block for its derived
templates to define the page content.
Now, we need to make our "base.html" file in the "templates" folder inherit from the Bootstrap base
template.
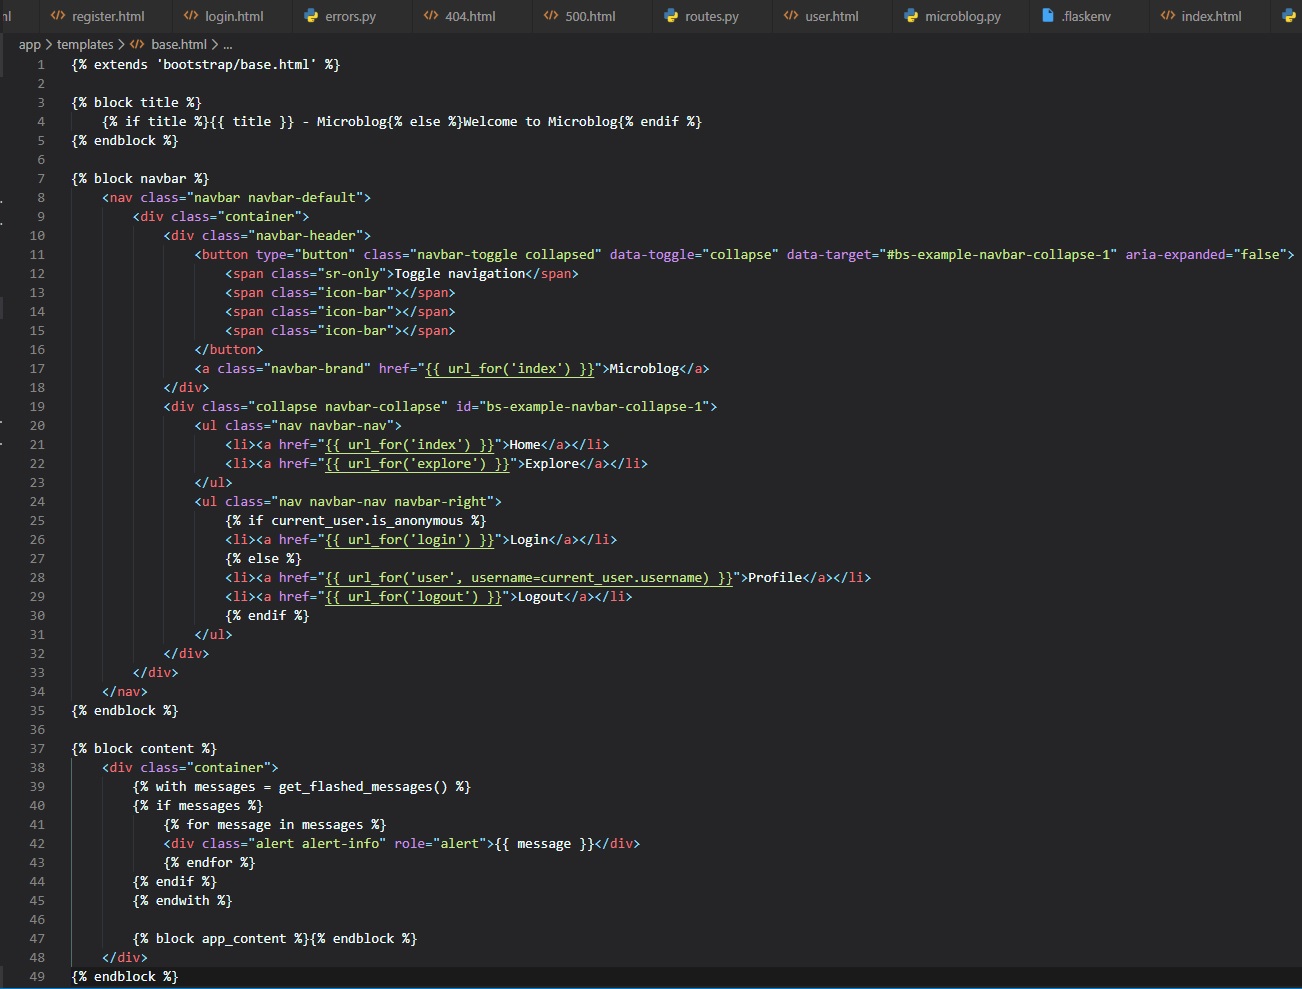
Here you can see how we made this template derive form "base.html" file in the "bootstrap" folder,
followed by the three blocks
that implement the: page title, navigation bar and page content.
The "title" block needs to define the text that'll be used for the page title, with the "title" tags.
For this block, we simply moved
the logic that was inside the "title" tag in the original base template.
The "navbar" block is an optional block that can be used to define a navigation bar. For this block,
we included a site branding on the left end,
followed by the "Home" and "Explore" links. We then added the "Profile" and "Login"/"Logout" links
aligned with the right border of the
page.
Finally, in the "content" block we're defining a "top-level" container, and inside it we have the
logic that renders flashed messages, which
are now going to appear styled as Bootstrap alerts automatically. That's followed with a new
"app_content" block that's defined just so
that derived templates can define their proper content.
The original version of all the page templates defined their content in a block named "content".
Since, the block named "content" is now
used by Flask-Bootstrap, we renamed our content block as "app_content". So, all our templates have
to be renamed to use "app_content" as their content block.
To do this, we can just do a search from all our files and replace "{% block content %}" with "{%
block app_content %}". This can be
done in Visual Studio Code, by first clicking on the 'Search' button:
Then, we need to indicate what we want to find, and what we want to replace it with in each of our
files. To do this, type this into
each of the boxes:
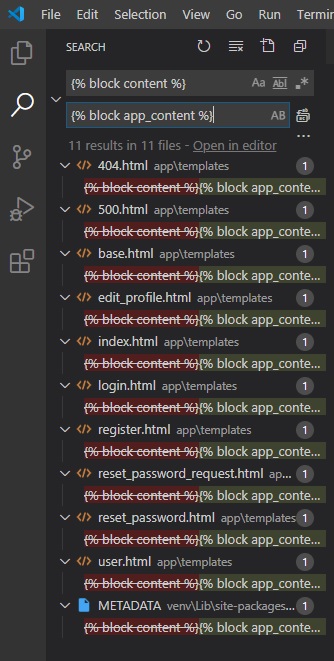
Now, we've found all files including the text we searched for, but we actually found a file called
"METADATA", which we don't want to touch.
We also don't want to modify the "base.html" file, since this is the only file in which we're
supposed to have "{% block conent %}" in,
and we've already changed the second block to "{% block app_content %}". So, to remove these two
files from your operation, simply right click on them and click "dismiss".
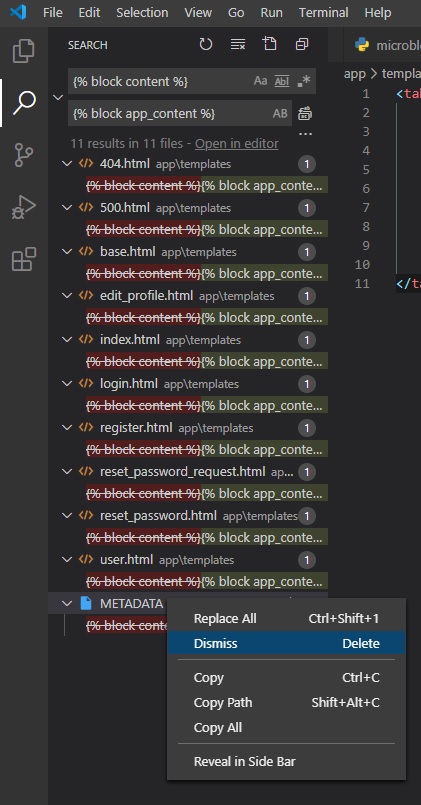
Now, just click on the "replace all" button found here:
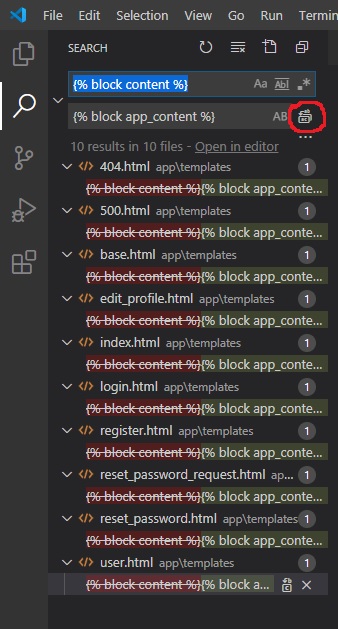
Rendering Bootstrap Forms
Instead of having to style the form fields one by one, Flask-Bootstrap comes with a macro that
accepts a Flask-WTF form object
as an argument and renders the complete form using Bootstrap styles. Now, to implement this feature
form Flask-Bootstrap, we need to
change up the register.html template:

The "import" statement near the top works similarly to a Python import. That adds a
"wtf.quick_form()" macro that, in a single line of
code, renders the complete form, including support for display validation errors.
Blog Post Rendering
The presentation logic that renders a single blog post was abstracted into a sub-template file called
"_post.html". All we need to do
with this template is make some minor adjustments so that it looks good under Bootstrap.
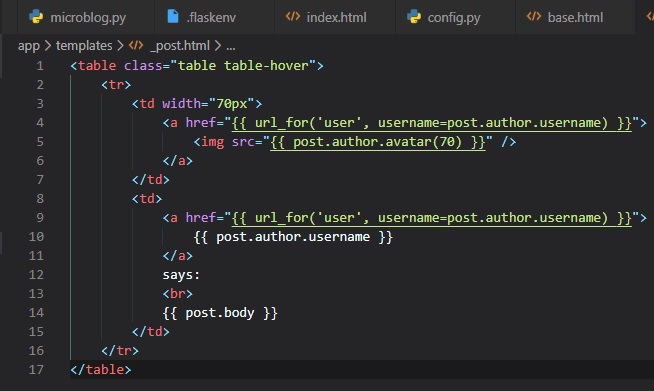
Rendering Pagination Links
For pagination links, we're just going to adapt one of the examples in the Bootstrap documentation.
Here's what they look like in the "index.html" page:
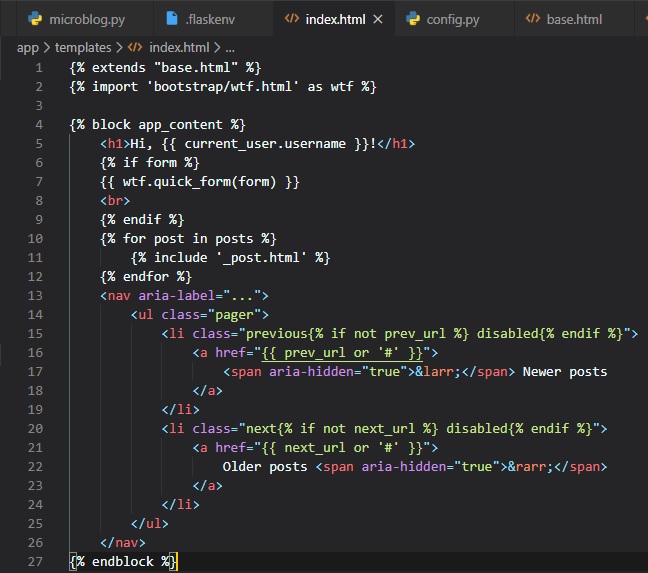
Note that in this implementation, instead of hiding the next or previous link when that direction
doesn't have any more content,
we're applying a disabled state, which will make the link appear grayed out.
We also need to implement a similar change in the some other files.
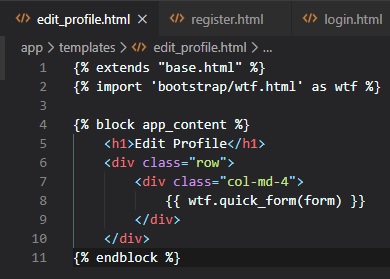
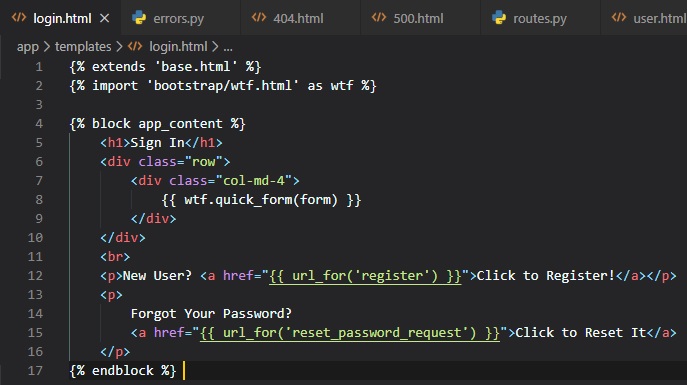
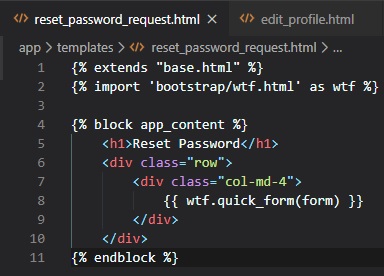
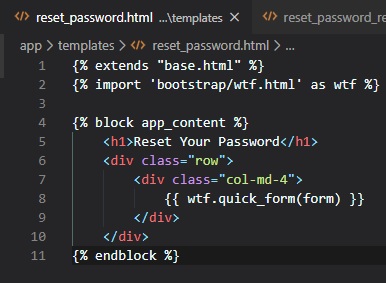
Now, let's finally go ahead and run the application to see the improvements in design and what it
looks like now.
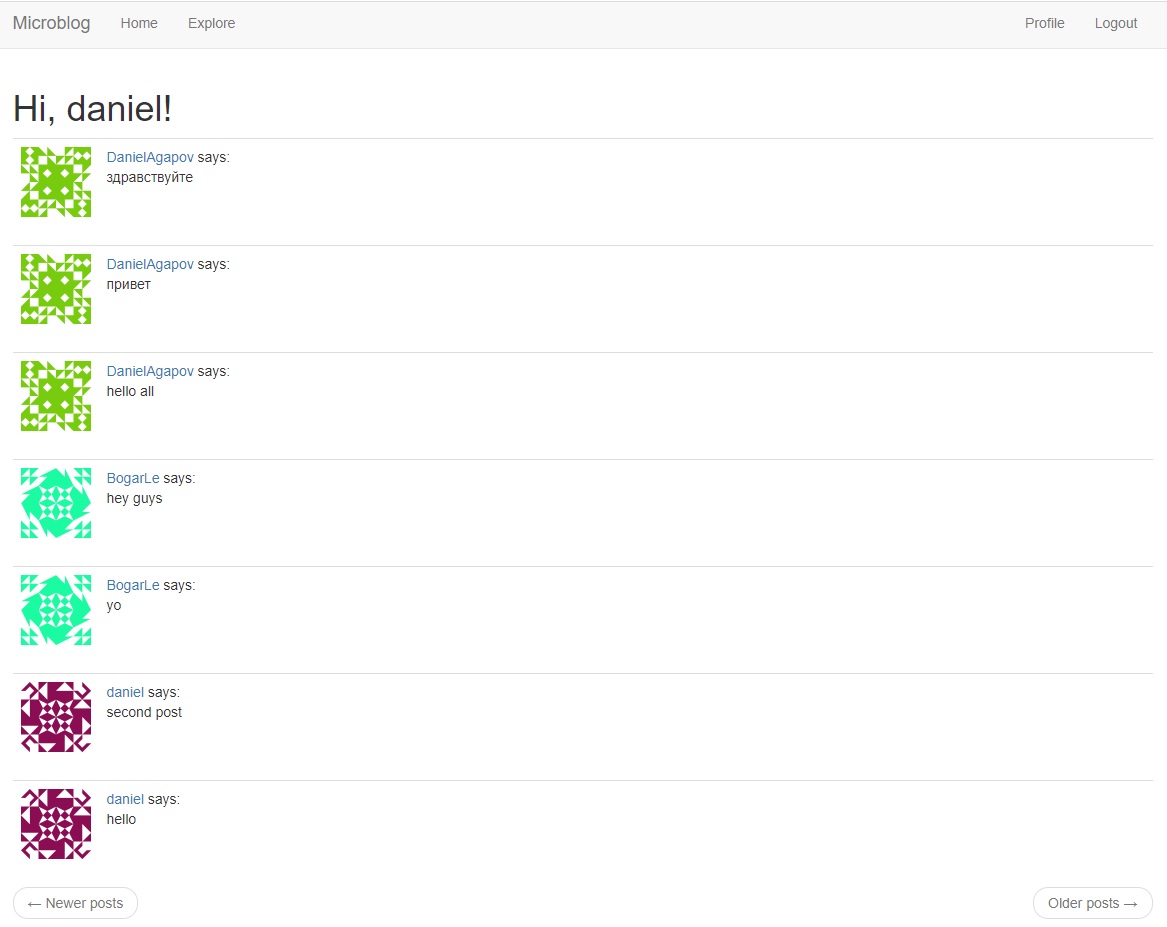
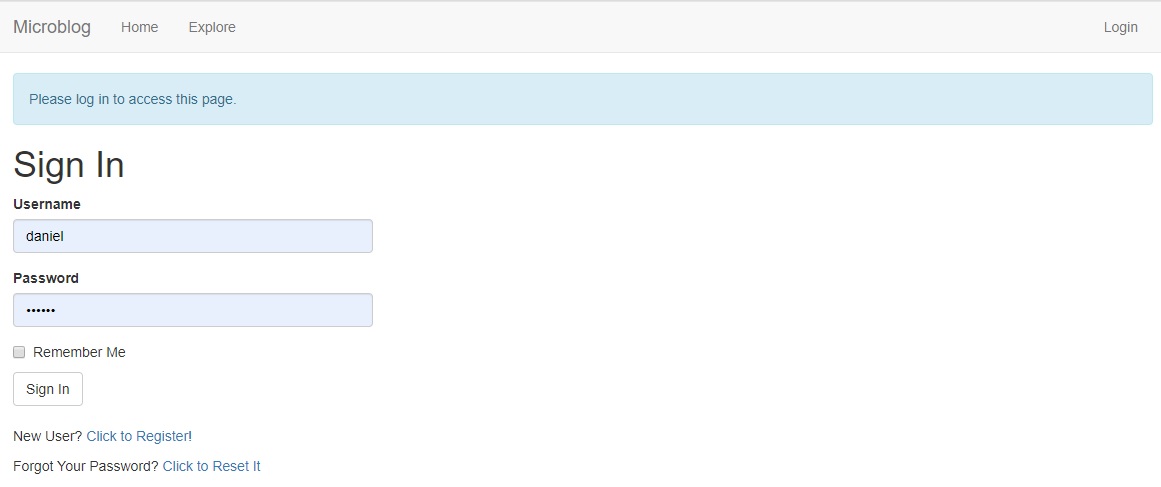

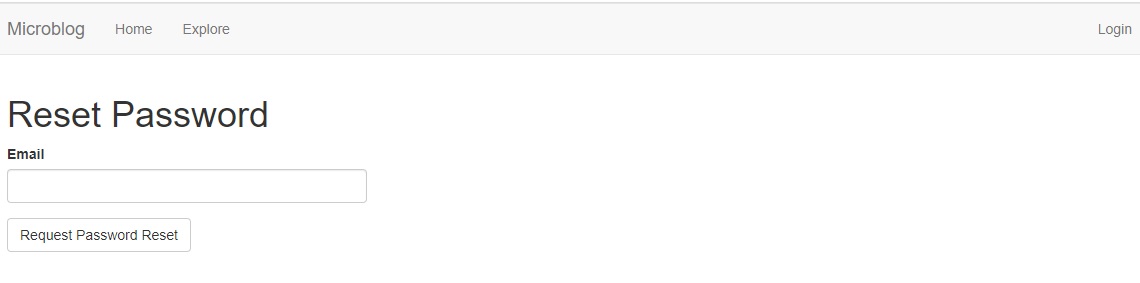
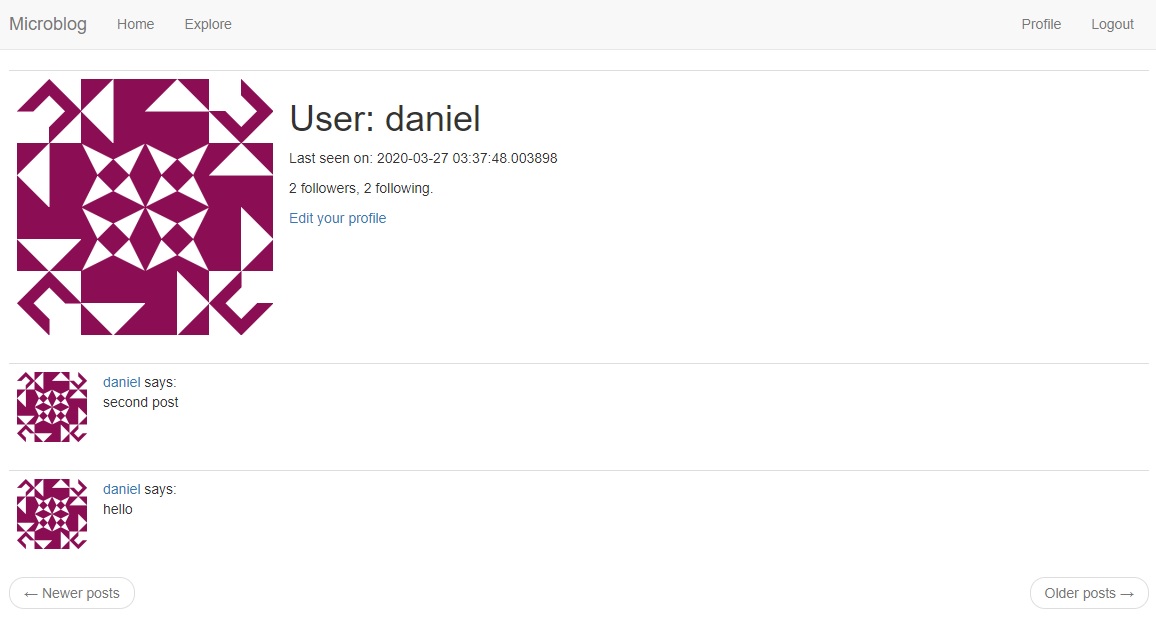
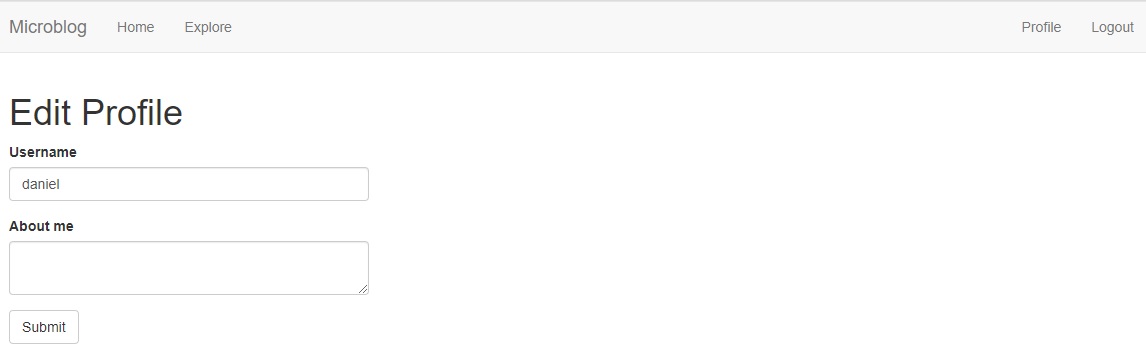
Timezone Conversions
Using Python on the server to render dates and times that are presented to users on their web
browsers isn't
great. Since, it either displays the current time appropriate to your current timezone with the
"datetime.now()" function,
or displays the current time regardless of location with the "datetime.utcnow()" function.
It's evident then, that the server must manage times that are consistent and independent of location.
So, we're
obviously going to be using the utc (universal time coordinated) standard method of displaying
current date and time.
However, there is one problem with this approach. For users in different timezones, it'll be awfully
difficult to
figure out when a post was made if they see times in the UTC timezone. To resolve this issue, we're
going to
address this problem while keeping all the timestamps managed in the server in UTC.
What's really tough about converting UTC times to localized ones for each user's location, is knowing
the location of
the user. Many webistes simply have a configuration page where users can specify their timezone.
This would require us
to add a new page with a new form to be presented to users, as well as, the inconvenience for users
to require them
to set this up when they register their accounts.
As it turns out, though, the web browser knows the user's timezone, and exposes it through the
standard data dn time
JavaScript API (Application Programming Interface)s. So, using JavaScript, we're simply not going to
change a thing in the
server, and let the conversion from UTC to local time happen in the client. In addition to just the
date and time of the user,
the browser also has access to the system locale configuration, which specifies things like AM/PM vs
24 hour clock,
DD/MM/YYYY vs. MM/DD/YYYY and many other cultural or regional styles to formatting the data and
time.
Introducing Moment.js & Flask-Moment
Moment.js is a small open-source JavaScript library that provides every imaginable formatting option.
Flask-Moment
is a small Flask extension that makes it very easy to incorporate moment.js into our application.
Let's start by installing it.

Now, as usual, just add an instance of this class to the "__init__.py" file.
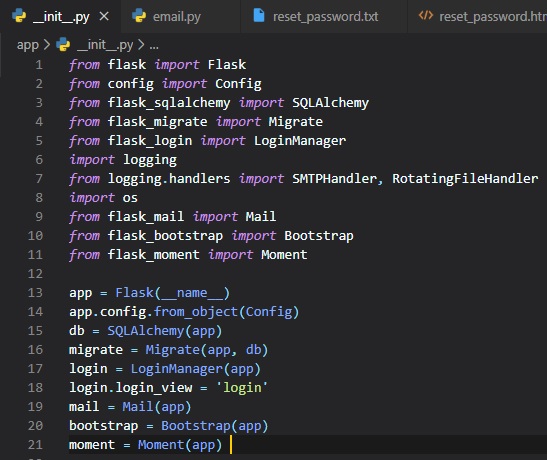
To ensure that this library is always available in all pages, we'll add it in the base template.
Normally, to add JavaScript to an HTML file, you'd have to incorporate a "script" tag and then enter
your code inside,
but Flask-Moment makes it easier, by exposing a "moment.include_moment()" function that generates
the "script" tag for you.
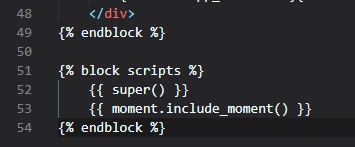
The "scripts" block that we've added here is another block supported by Flask-Bootstrap's base
template. This is where
JavaScript imports are to be included. This block is different from previous ones in that it already
comes with some
content defined in the base template. All we want to do here is add the moment.js library, without
losing the base contents.
This is done with the "super()" statement. If we were to have defined a block in our template
without using "super()",
then any content defined for this block in the base template would've been lost.
Using Moment.js
Moment.js makes a "moment" class available to the browser. The first step to rendering a timestamp is
to create an
object of this class, passing the desired timestamp in this format.
The format is as follows: (year)-(month)-(day)T(hour):(minute):(second)(timezone). An example is as
follows:

The last part is "Z", which represents the UTC in the ISO 8601 standard format.
The "moment" object provides several methods for different rendering options. Below are some of the
most common options:
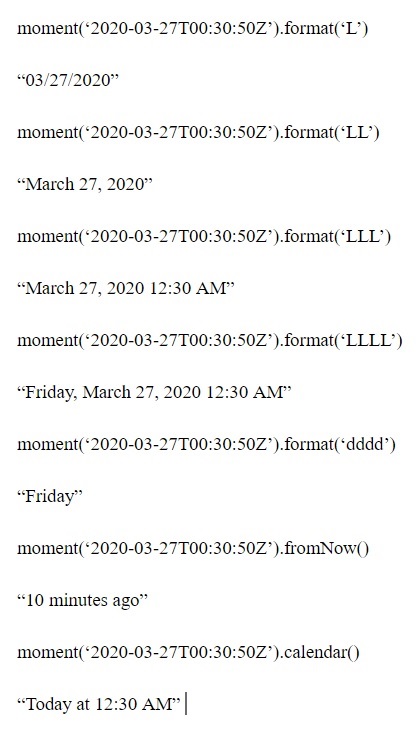
These examples all create a moment object initialized to March 27th 2020 at 12:30am UTC. YOu can see
that all the options
tried above are rendered in UTC-7, which is the timezone configured on our computers.
If we were working directly in JavaScript, the above calls would've returned a string that had the
rendered timestamp.
Then, it's up to us to insert this text in the proper place on the page. This whole process is
greatly simplified by
the Flask-Moment extension, though, by enabling a "moment" object similar to the JavaScript one in
our templates.
Let's take a look at the timestamp that appears in the profile page. The current "user.html" template
allows Python
to generate a string representation of the time. We can now render this timestamp using Flask-Moment
as follows:

The second place where we can take advantage of the Flask-Moment and moment.js is in the "_post.html"
sub-template,
which is invoked from the "index" and "user" pages. In the current version of the template, each
post preceded with
a "(username) says:" line. Now, we can add a timestamp rendered with "fromNow()".
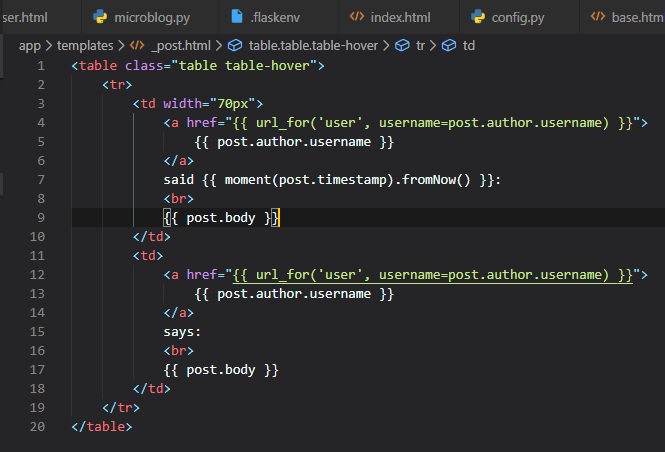
Now, this is what shows up in the browser: